Claude、Codex 与第三方客户端配置教程
从注册兑换、创建密钥,到 Claude Code、Codex、Cherry Studio、Roo Code 等客户端配置,全部内容和原教程截图都可以直接在本站查看。
Getting started
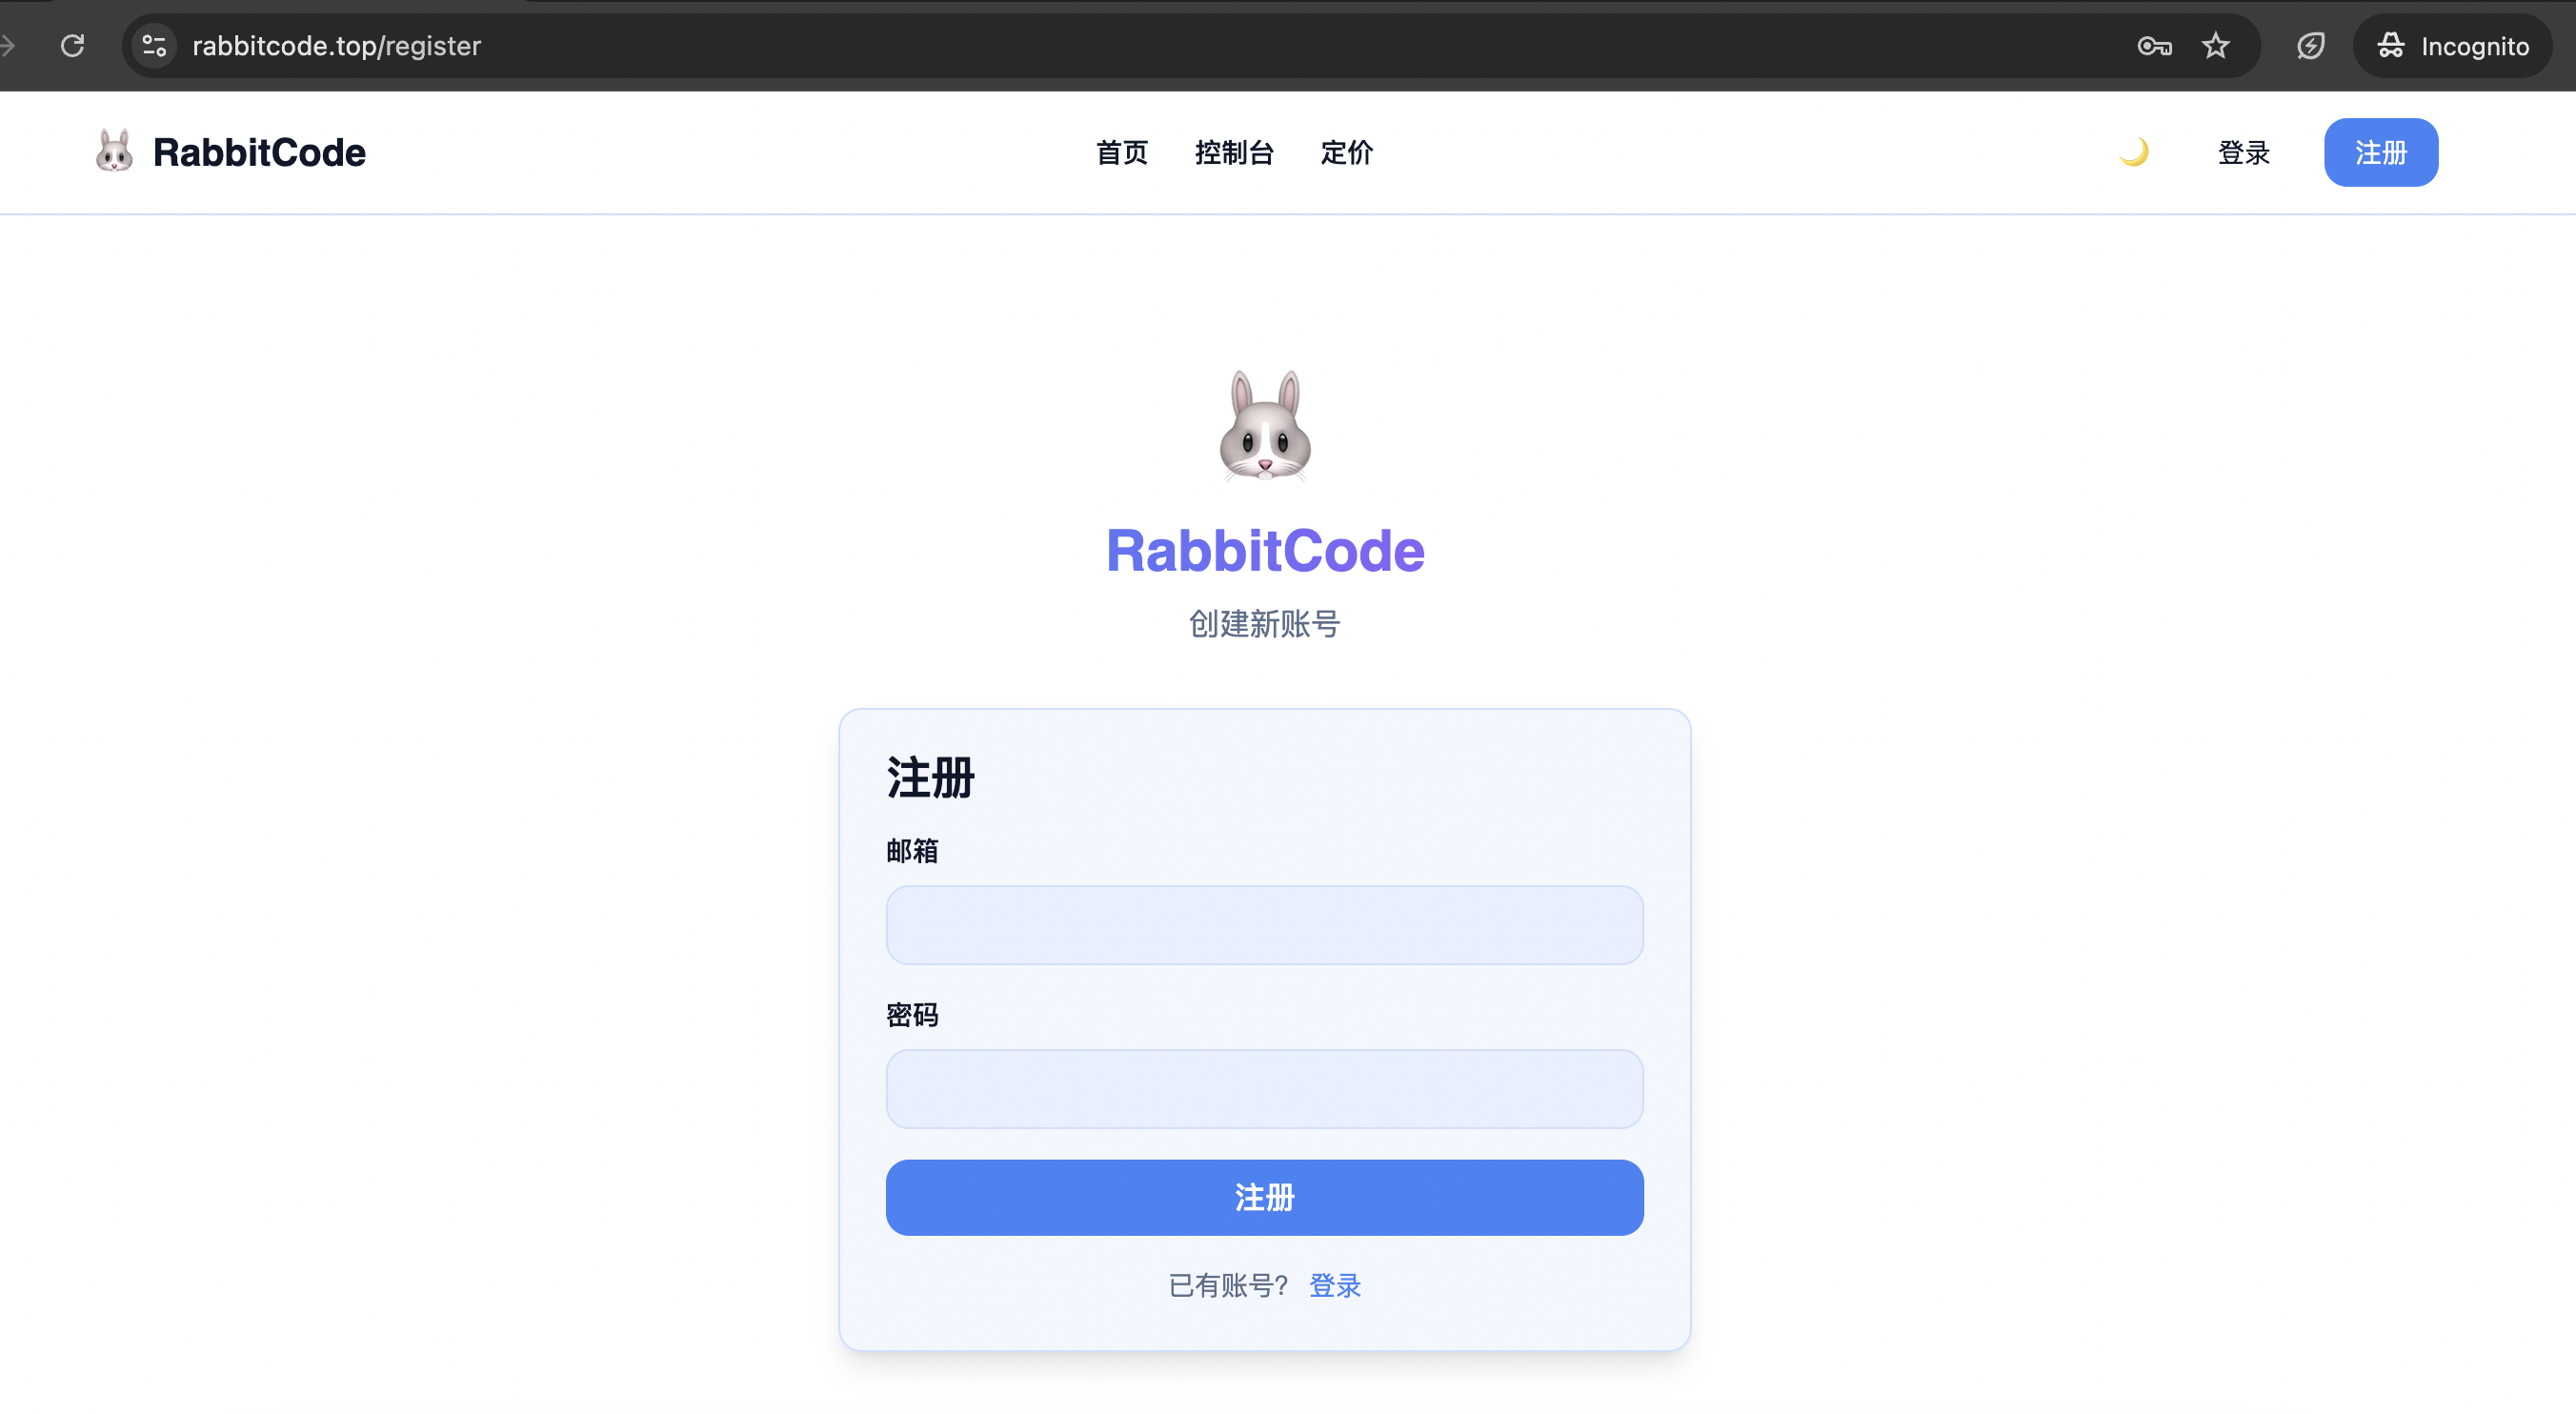
注册、兑换并创建 API Key
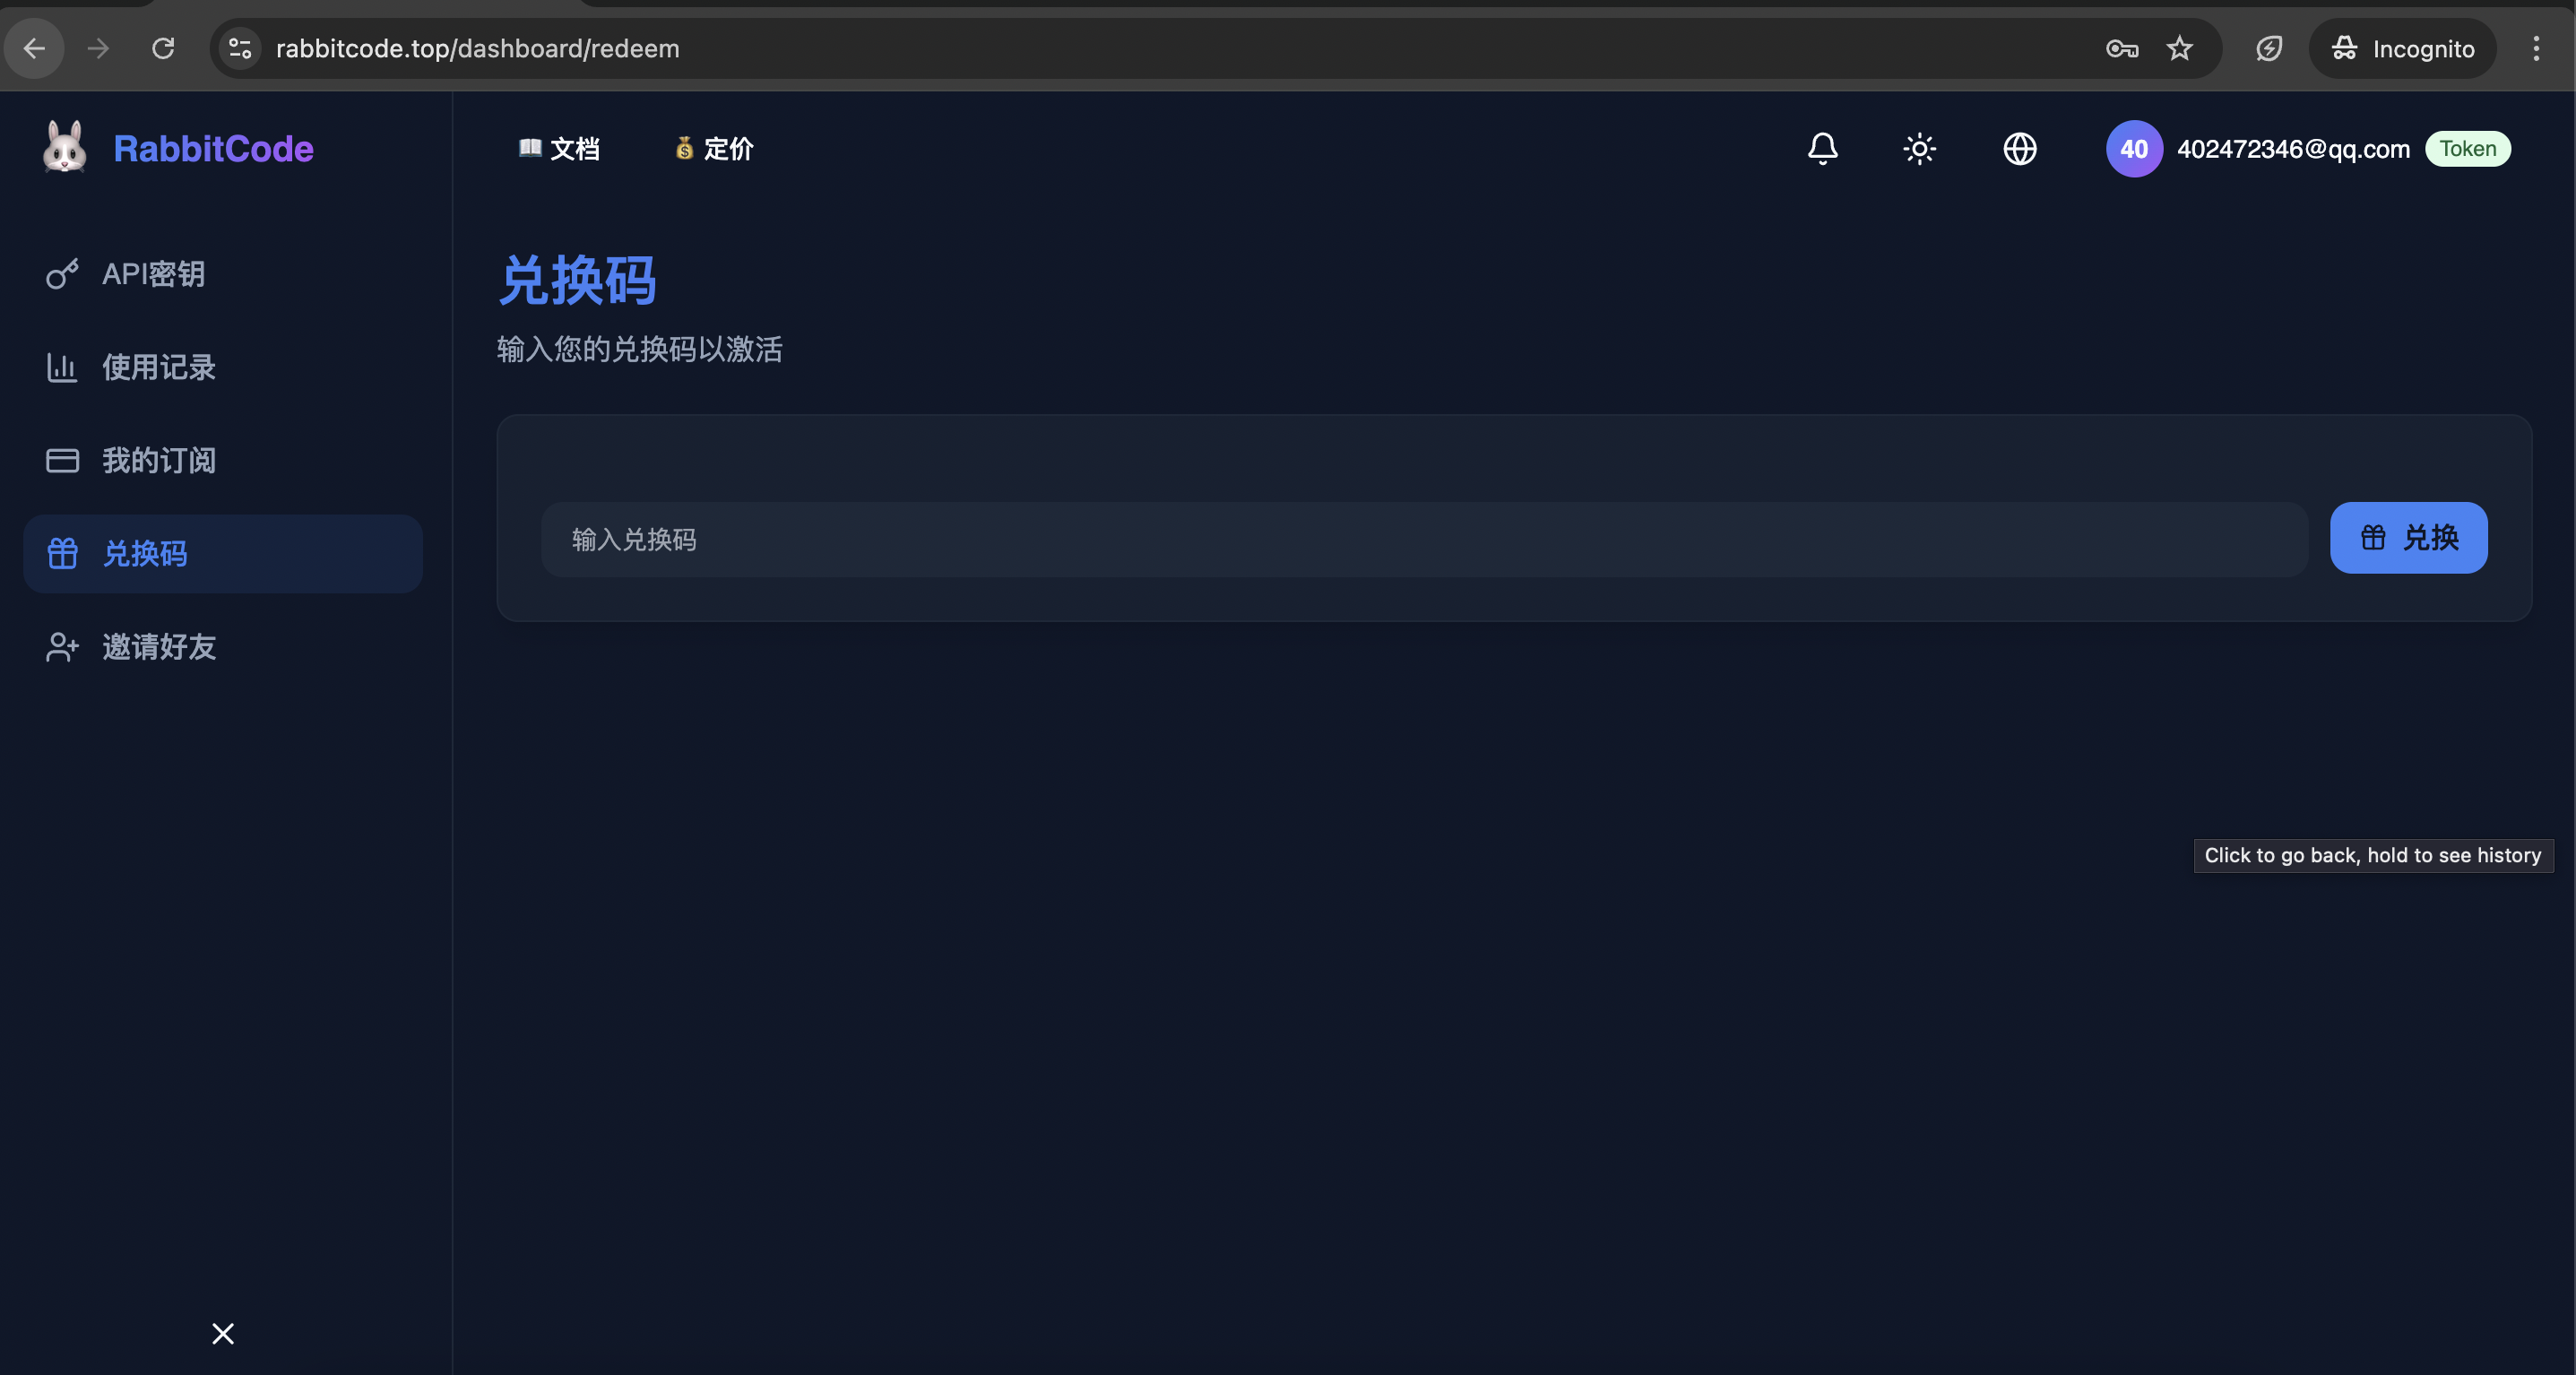
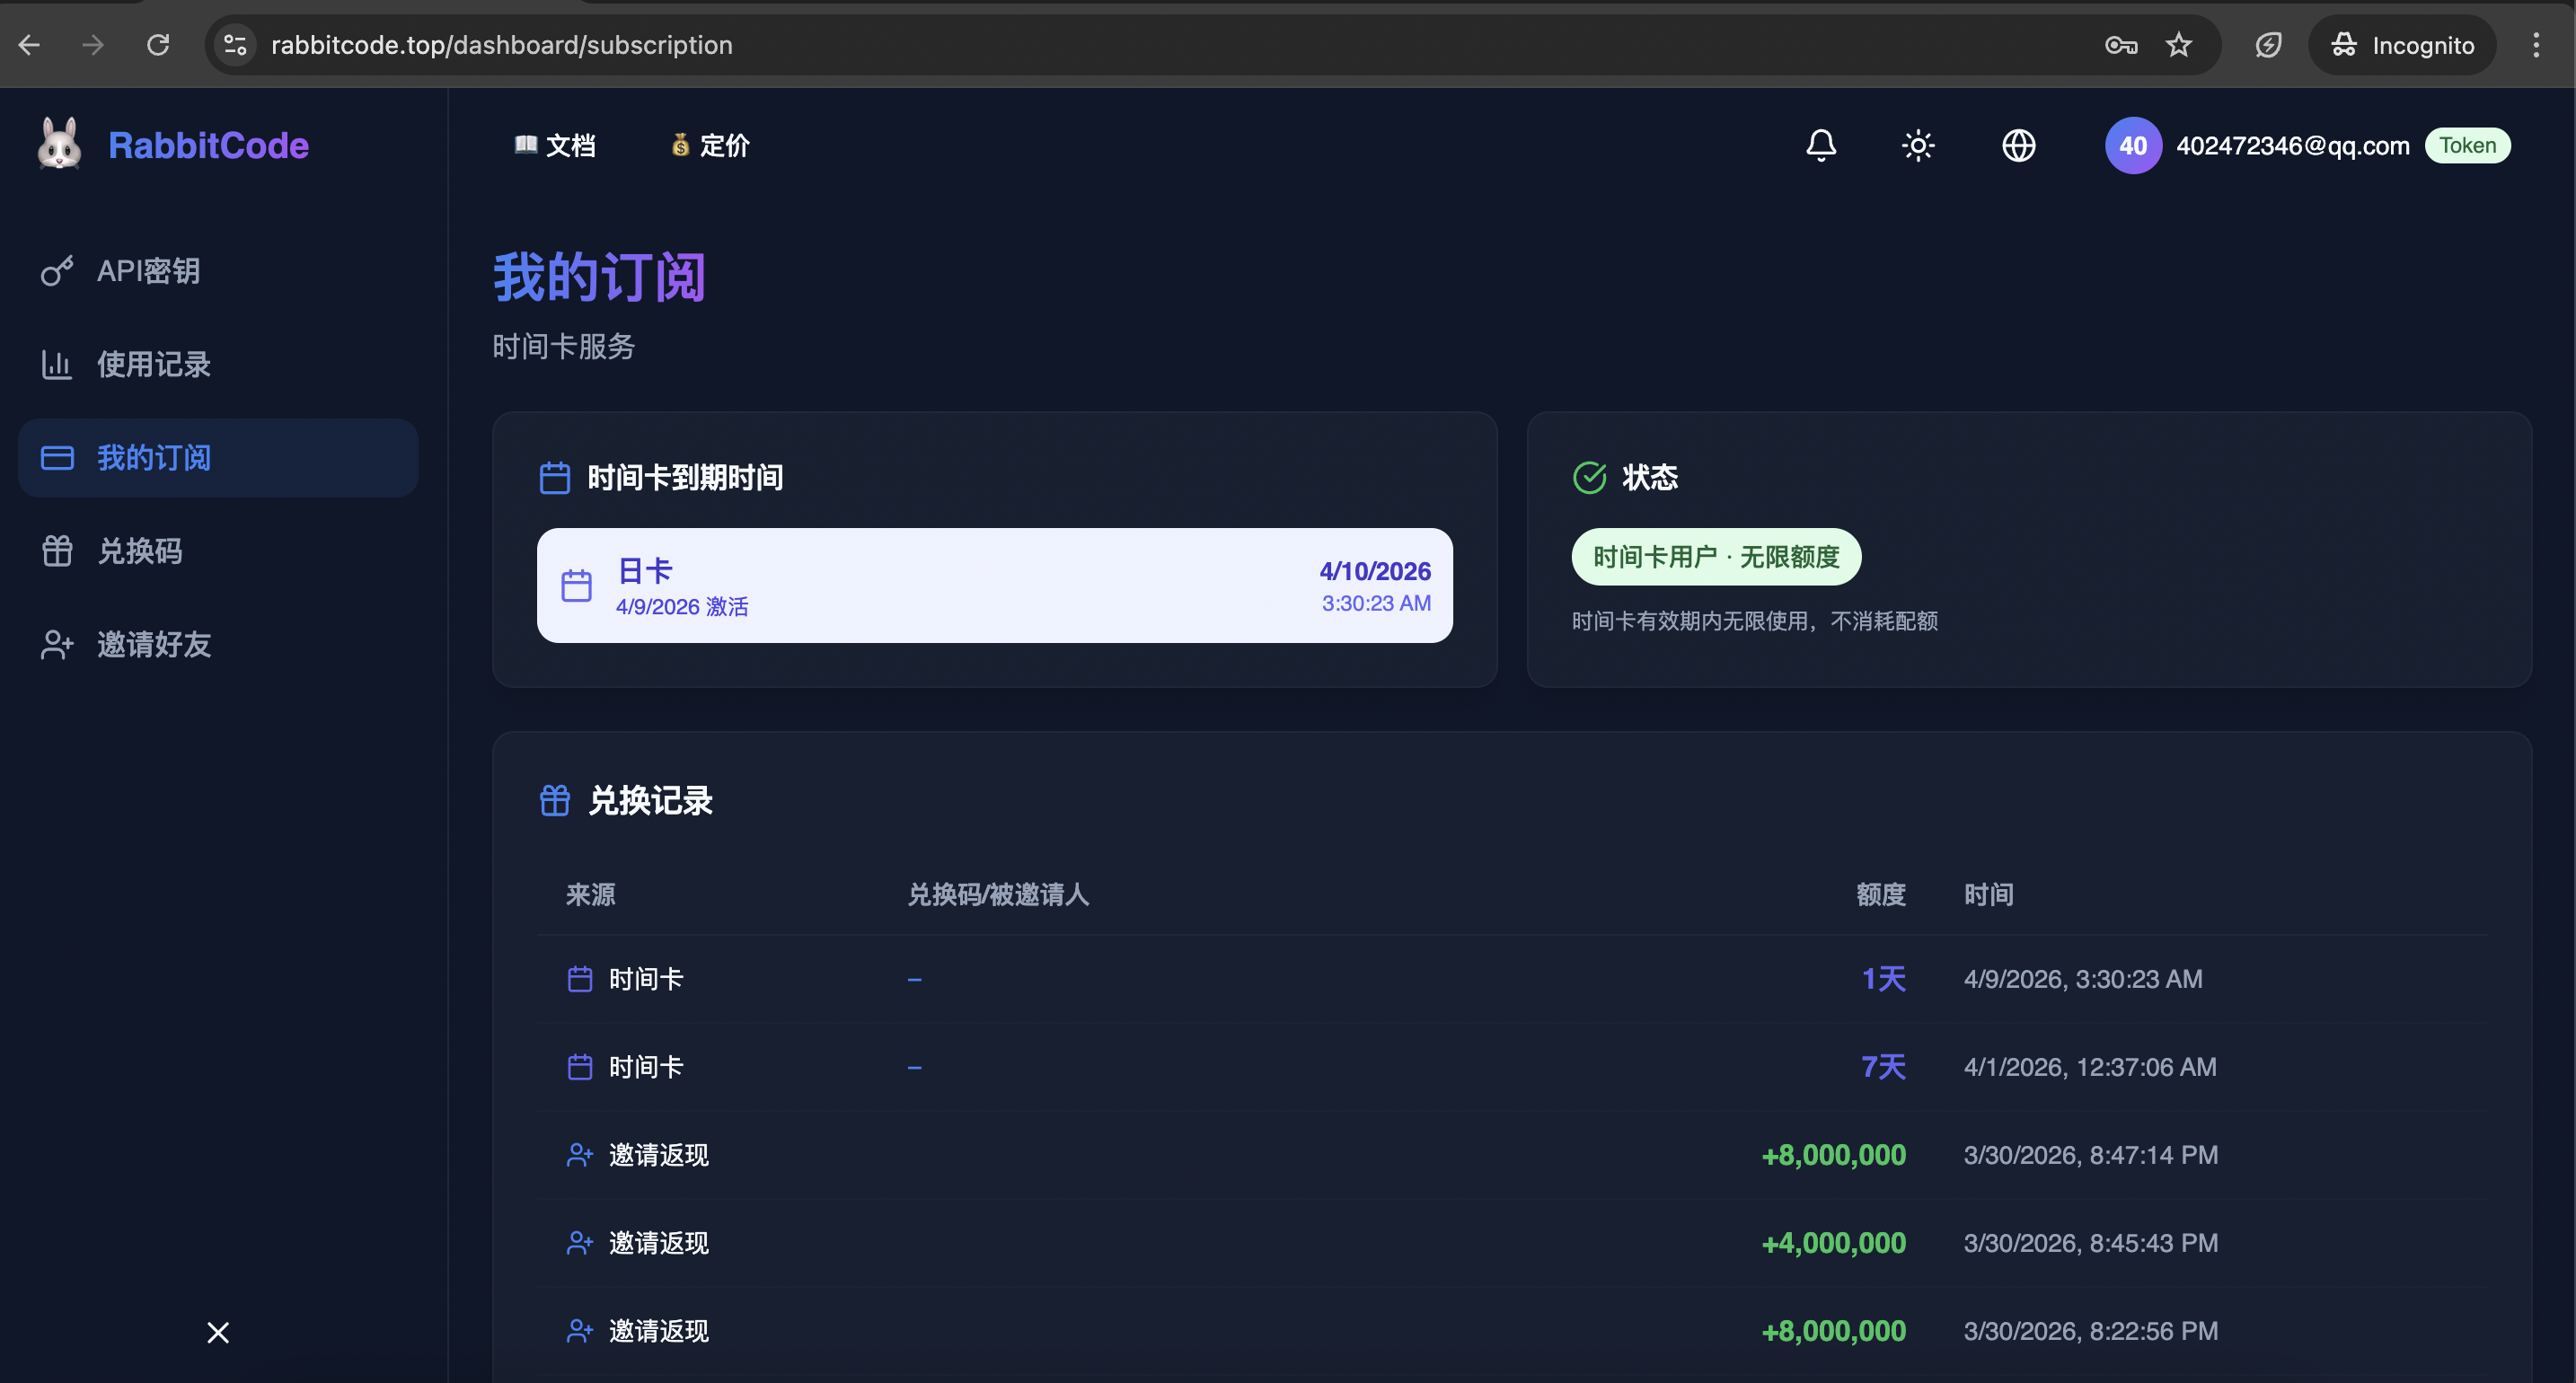
先完成 RabbitCode 账号注册,再使用购买后收到的兑换码充值。兑换码示例:CK-1775675344708-xxxxxxxx。
注册或登录
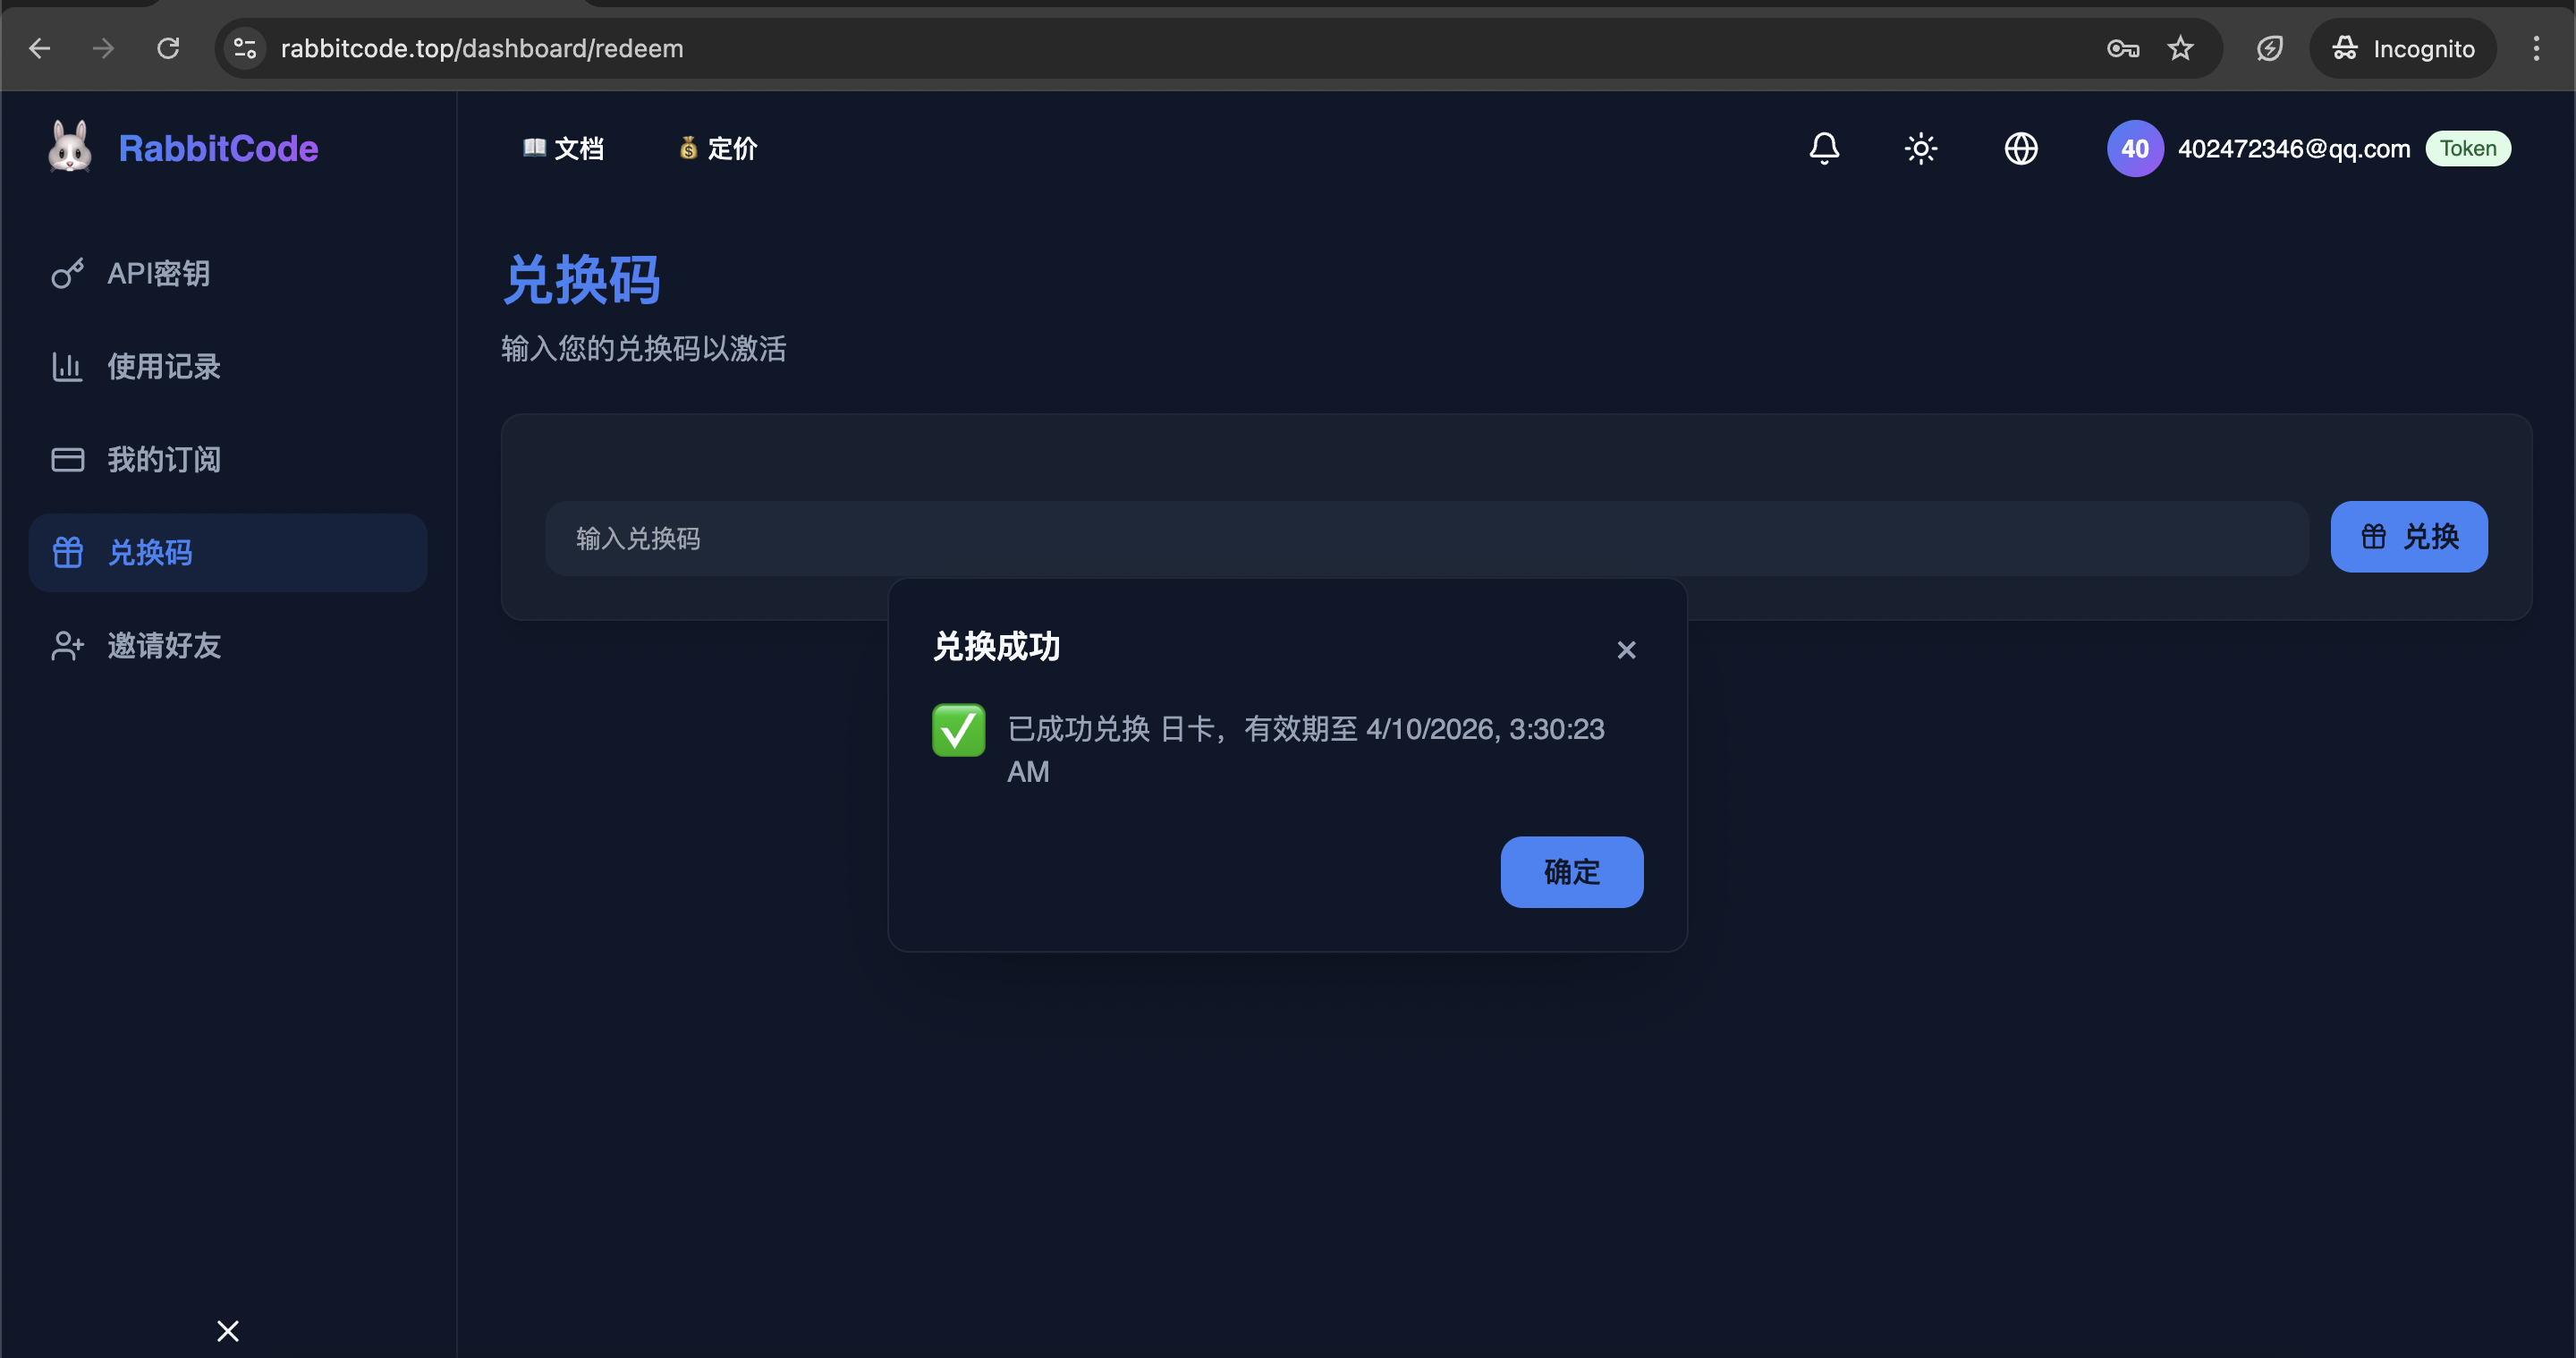
兑换额度
确认余额或时长
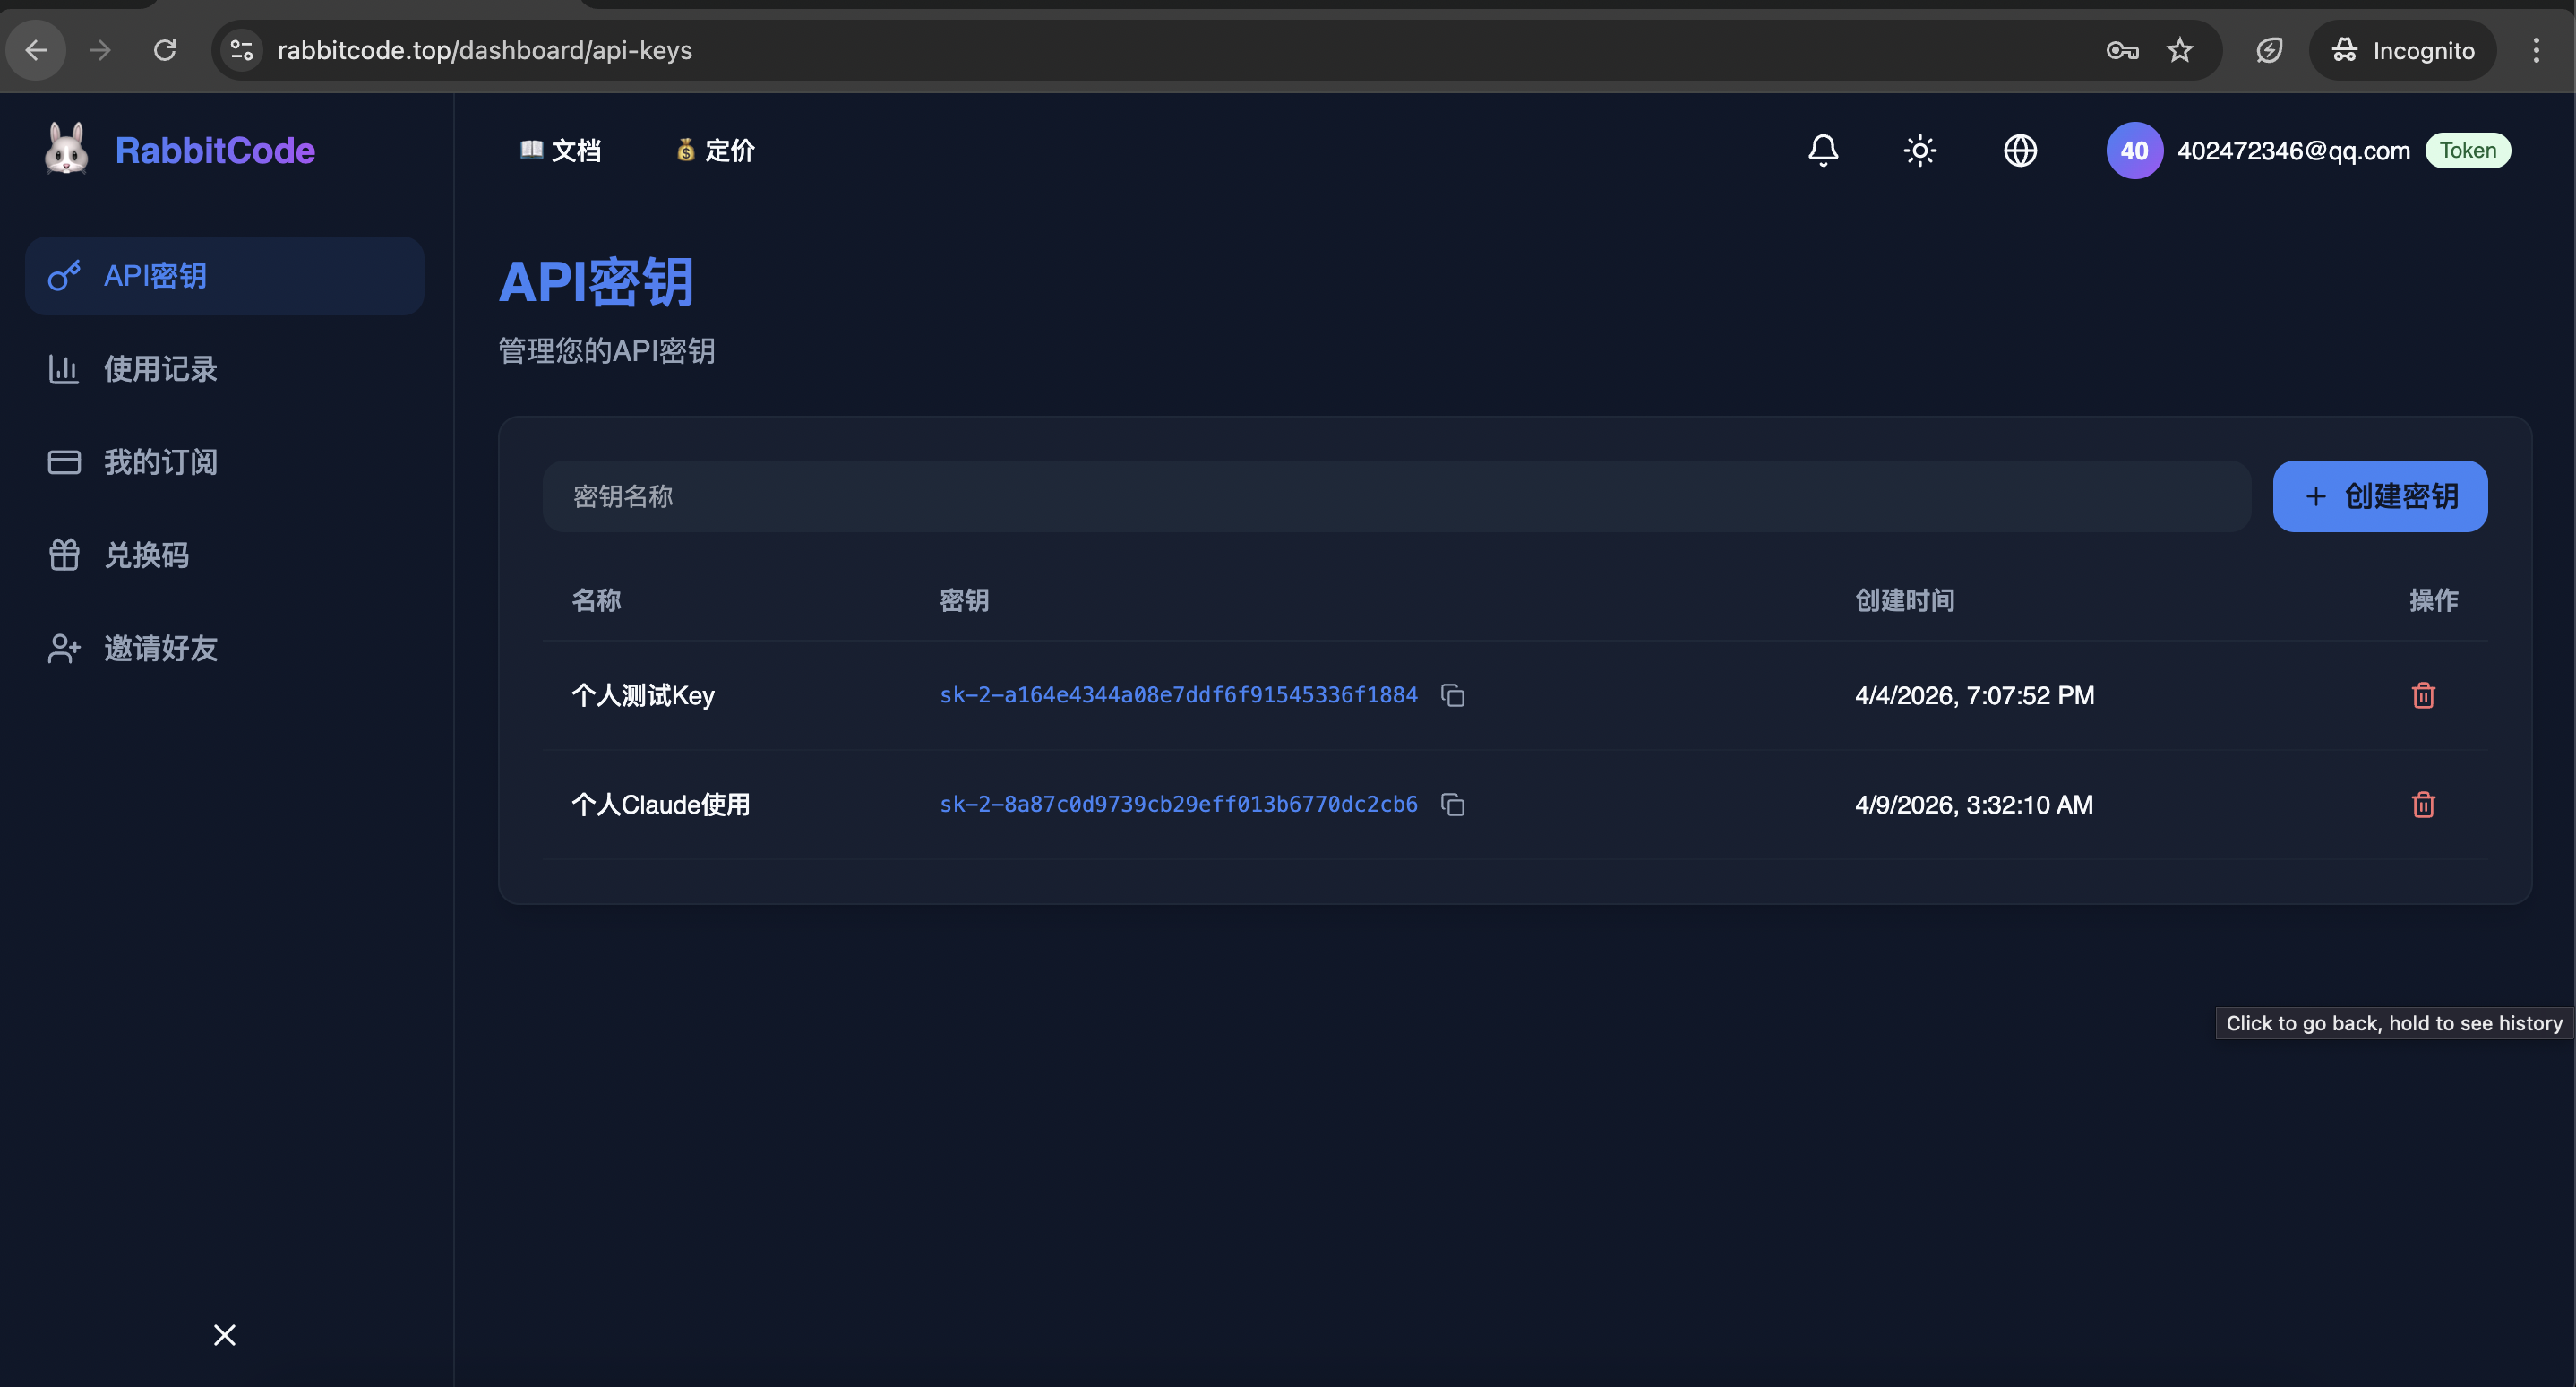
创建 API Key
Model IDs
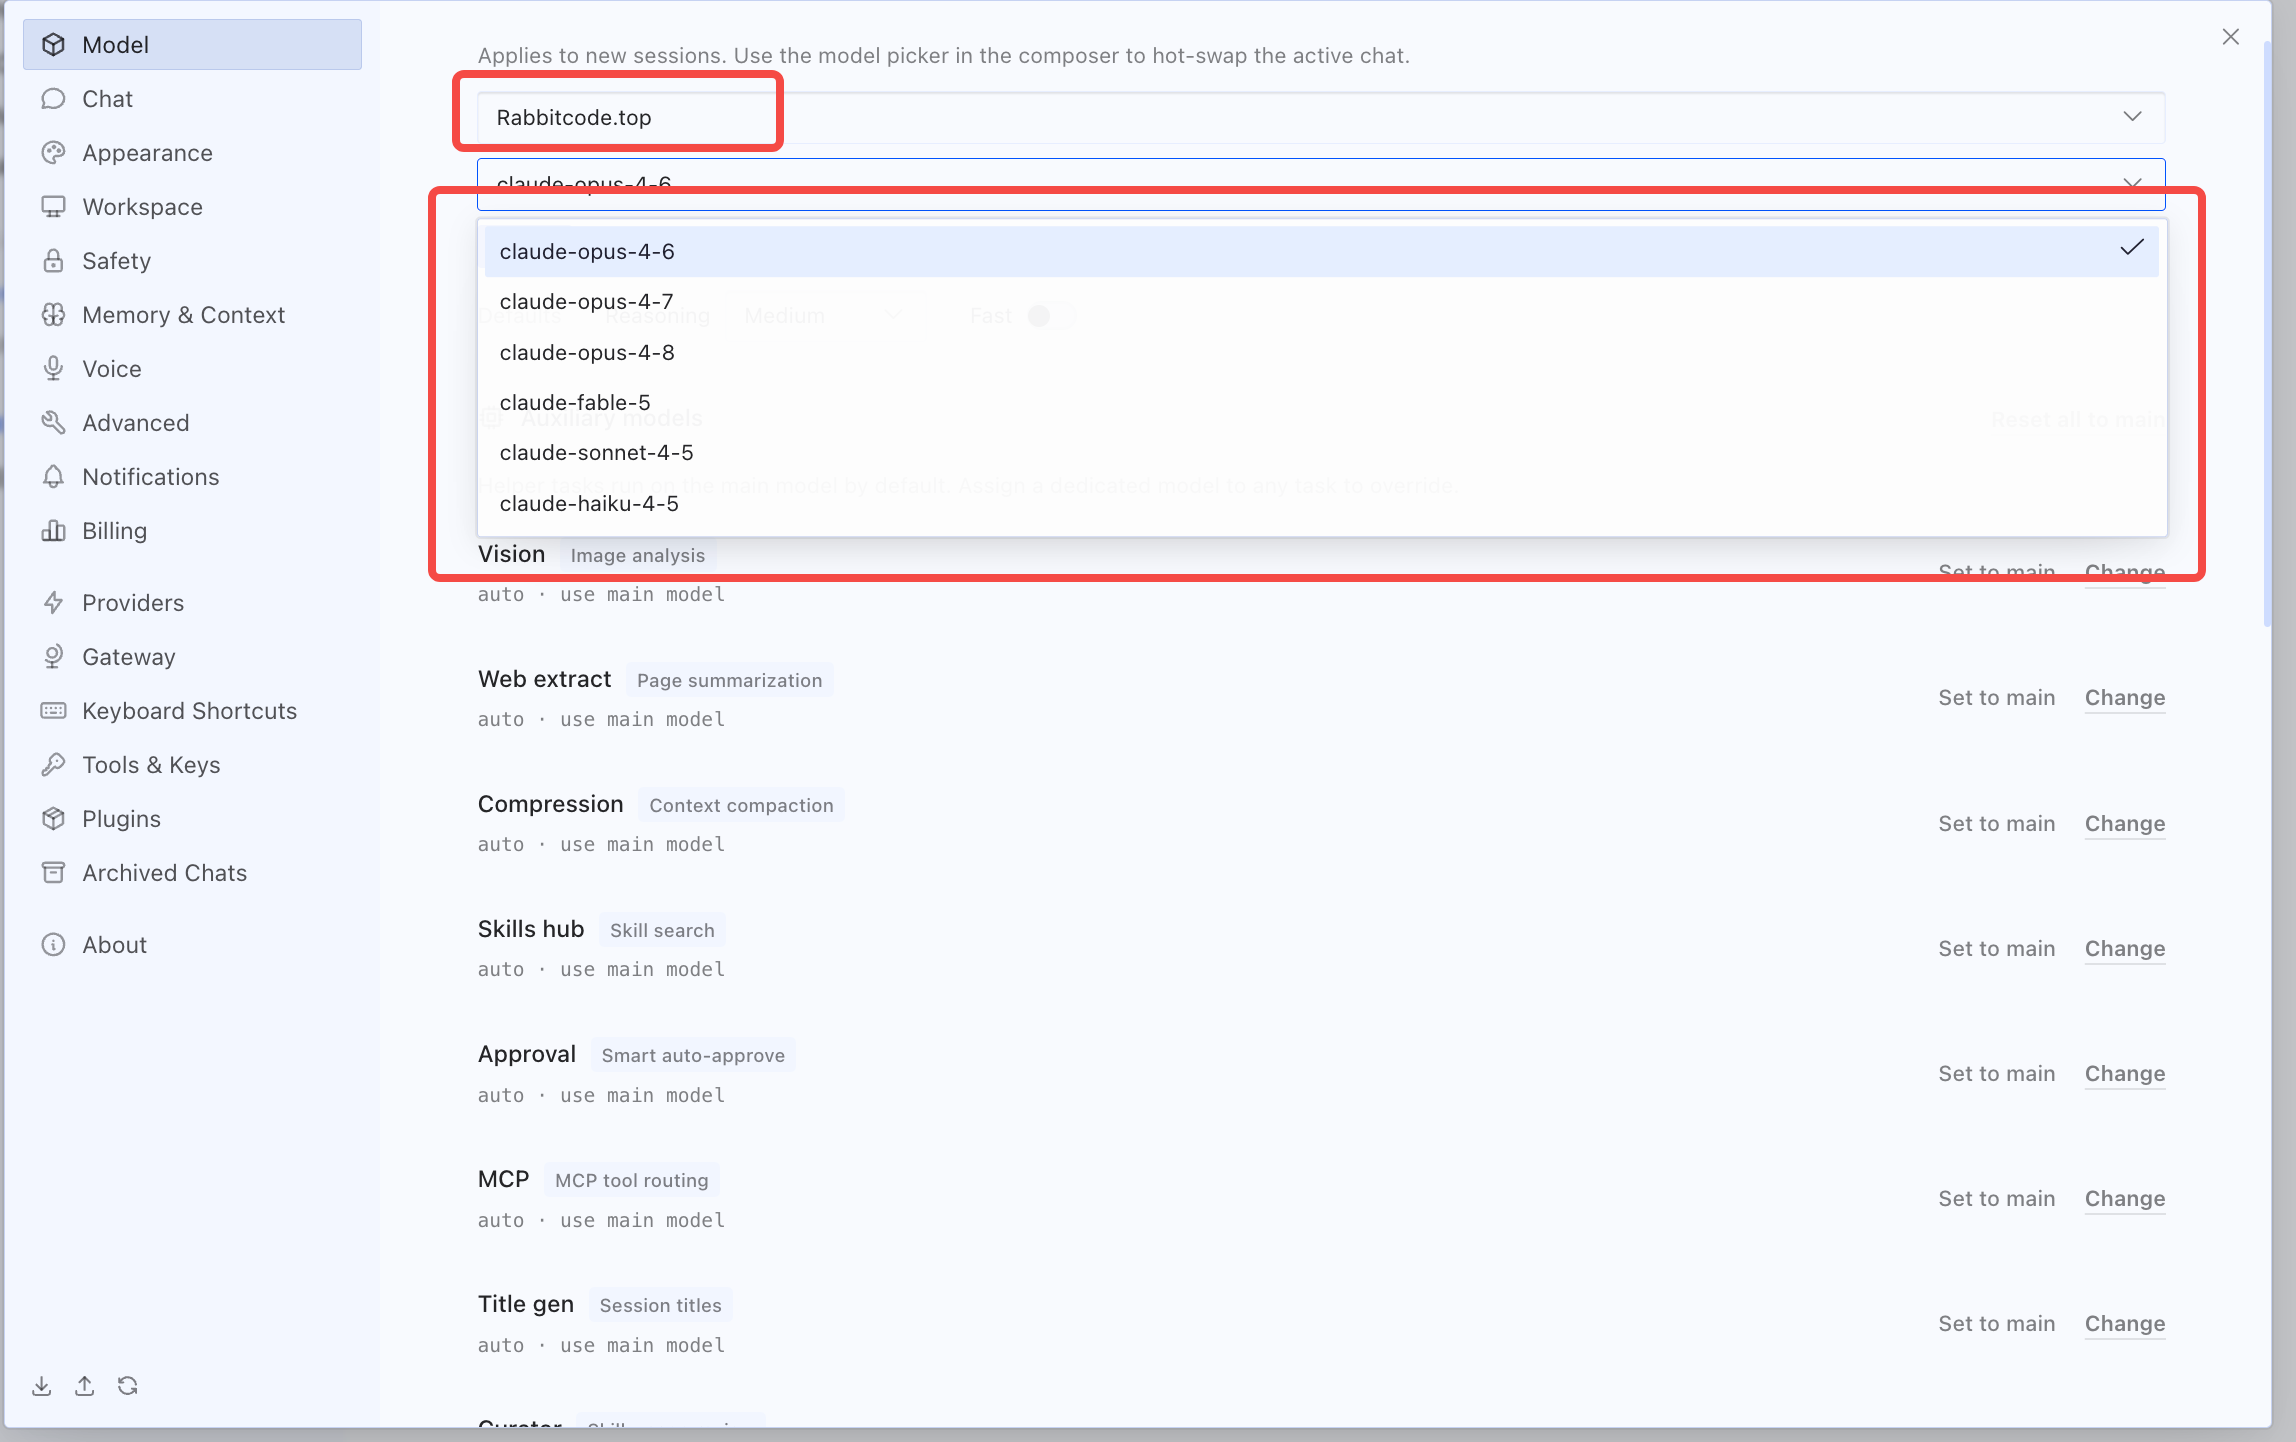
当前支持的模型 ID
下面的模型 ID 已通过本站实时模型接口核对。调用时请原样填写,注意中括号和连字符。
claude-opus-4-8claude-opus-4-7claude-opus-4-6claude-fable-5-1claude-fable-5[1m]claude-opus-5claude-opus-5-5claude-sonnet-5claude-sonnet-4-5claude-haiku-4-5claude-fable-5-1;旧 ID claude-fable-5[1m] 仍然保留兼容。Claude Desktop
Claude 桌面端配置
- 如果已经登录 Claude 桌面端,先退出当前账号。
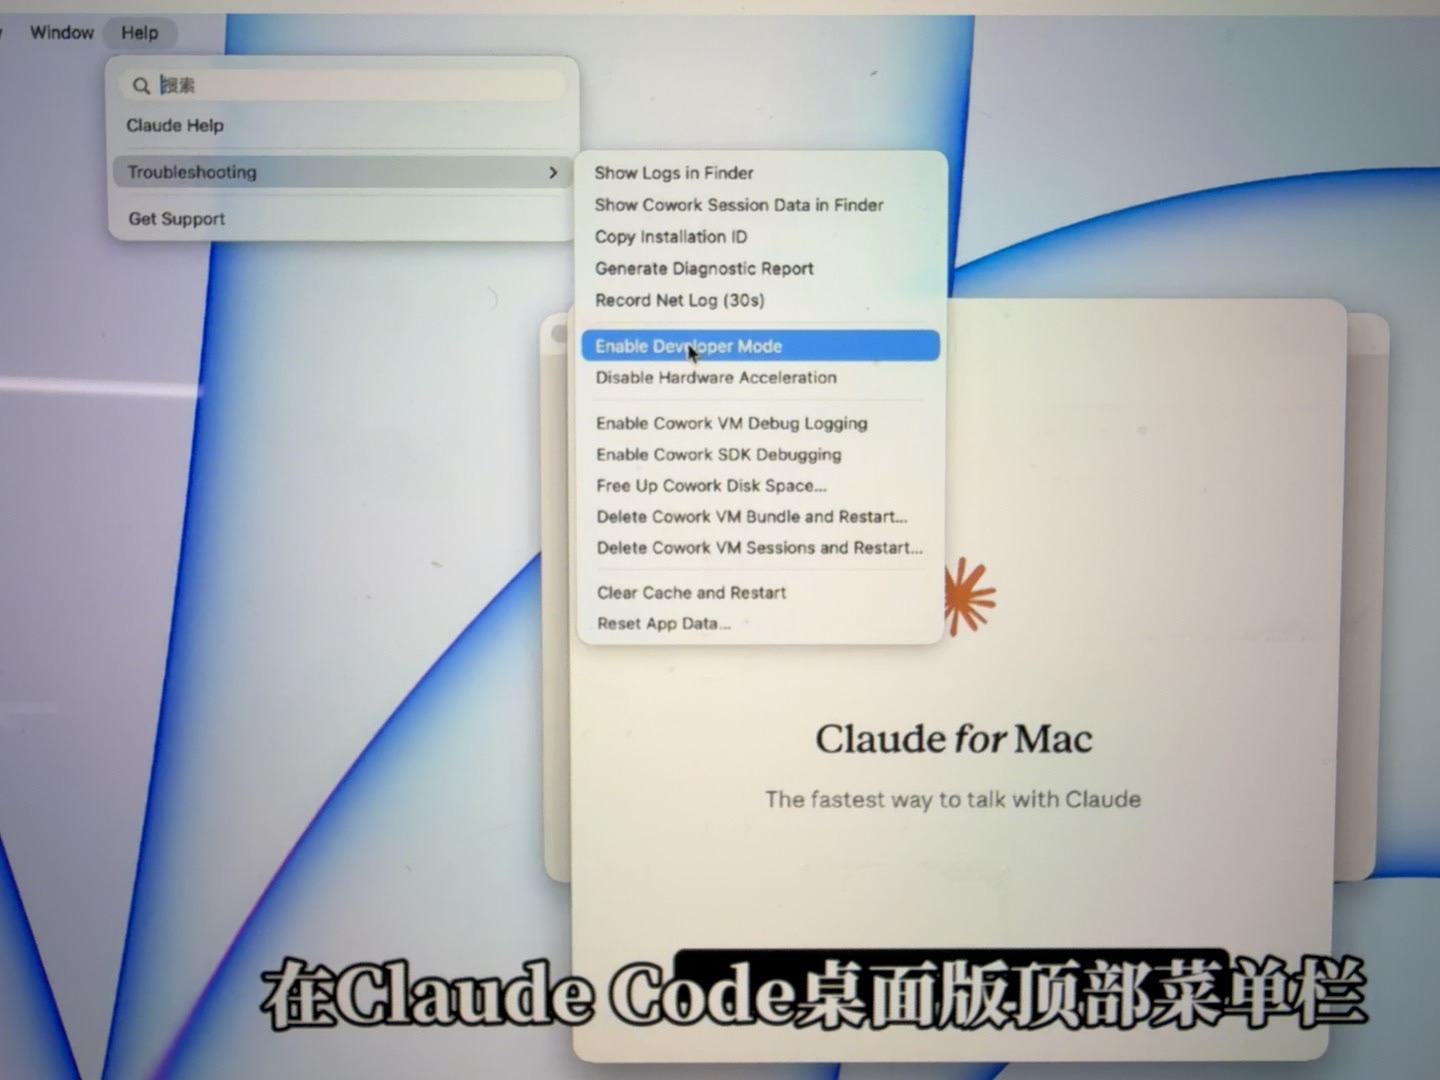
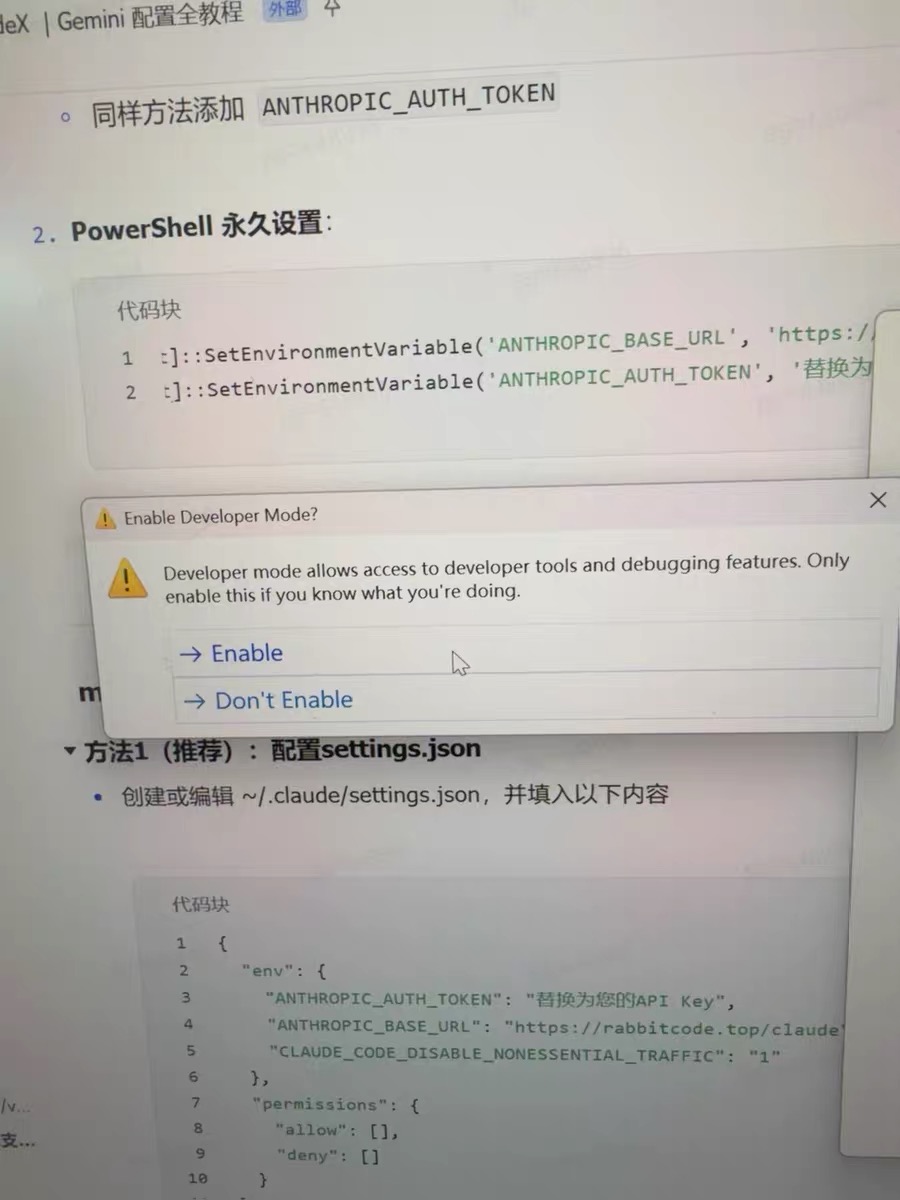
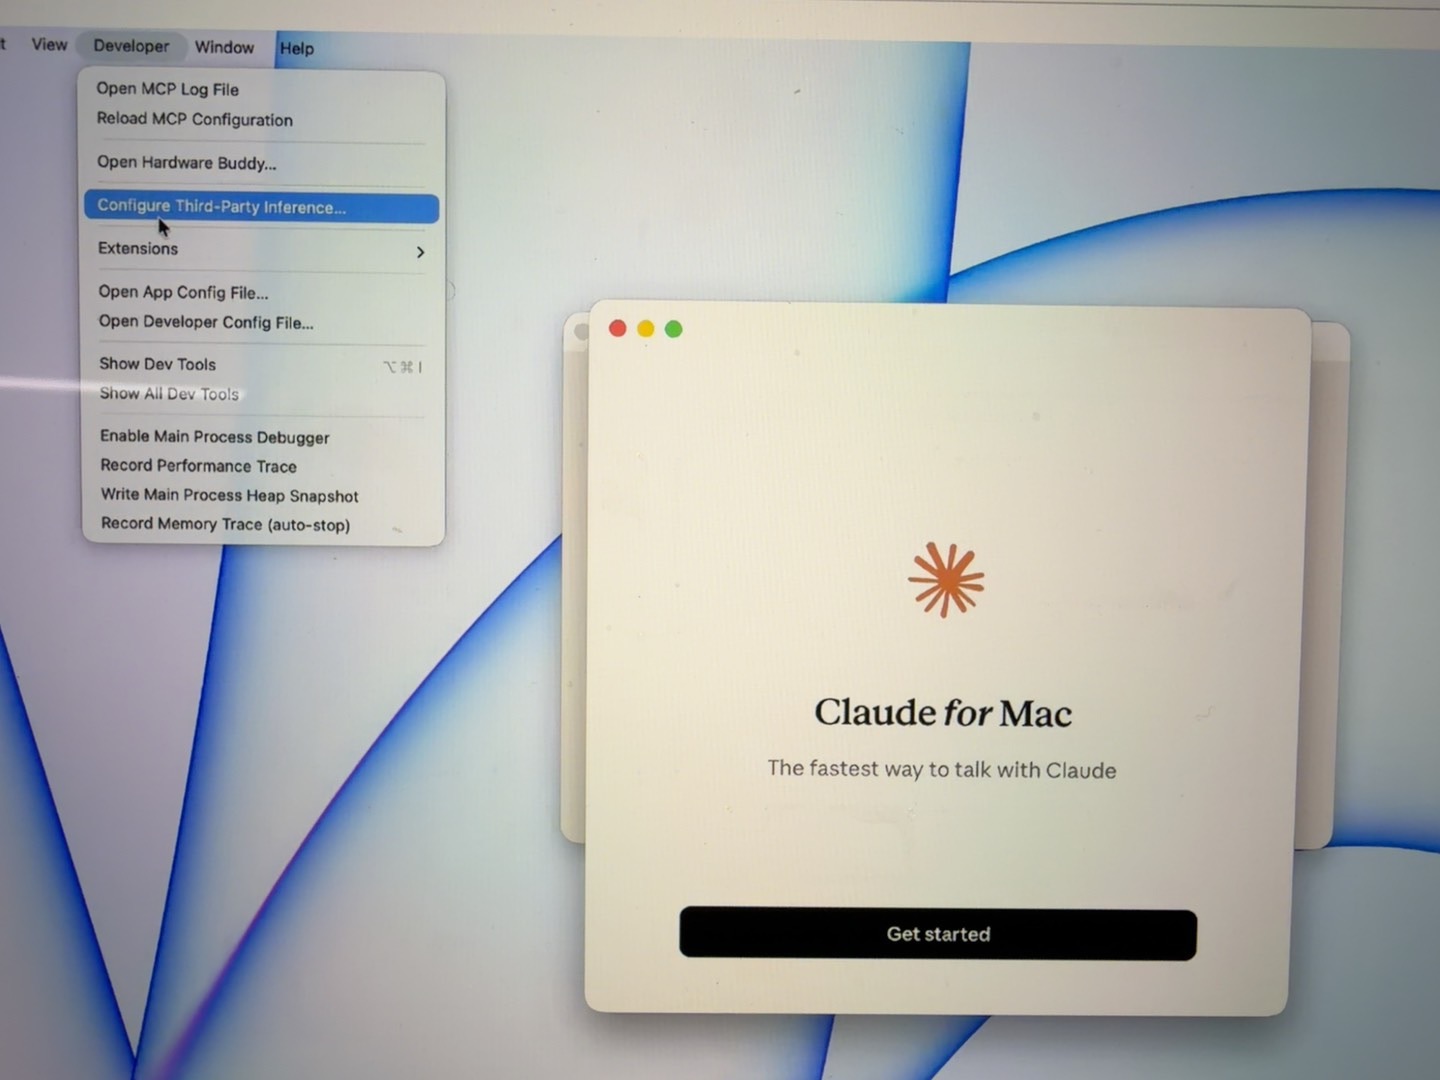
- 打开设置并启用 Developer Mode,应用会自动重启。
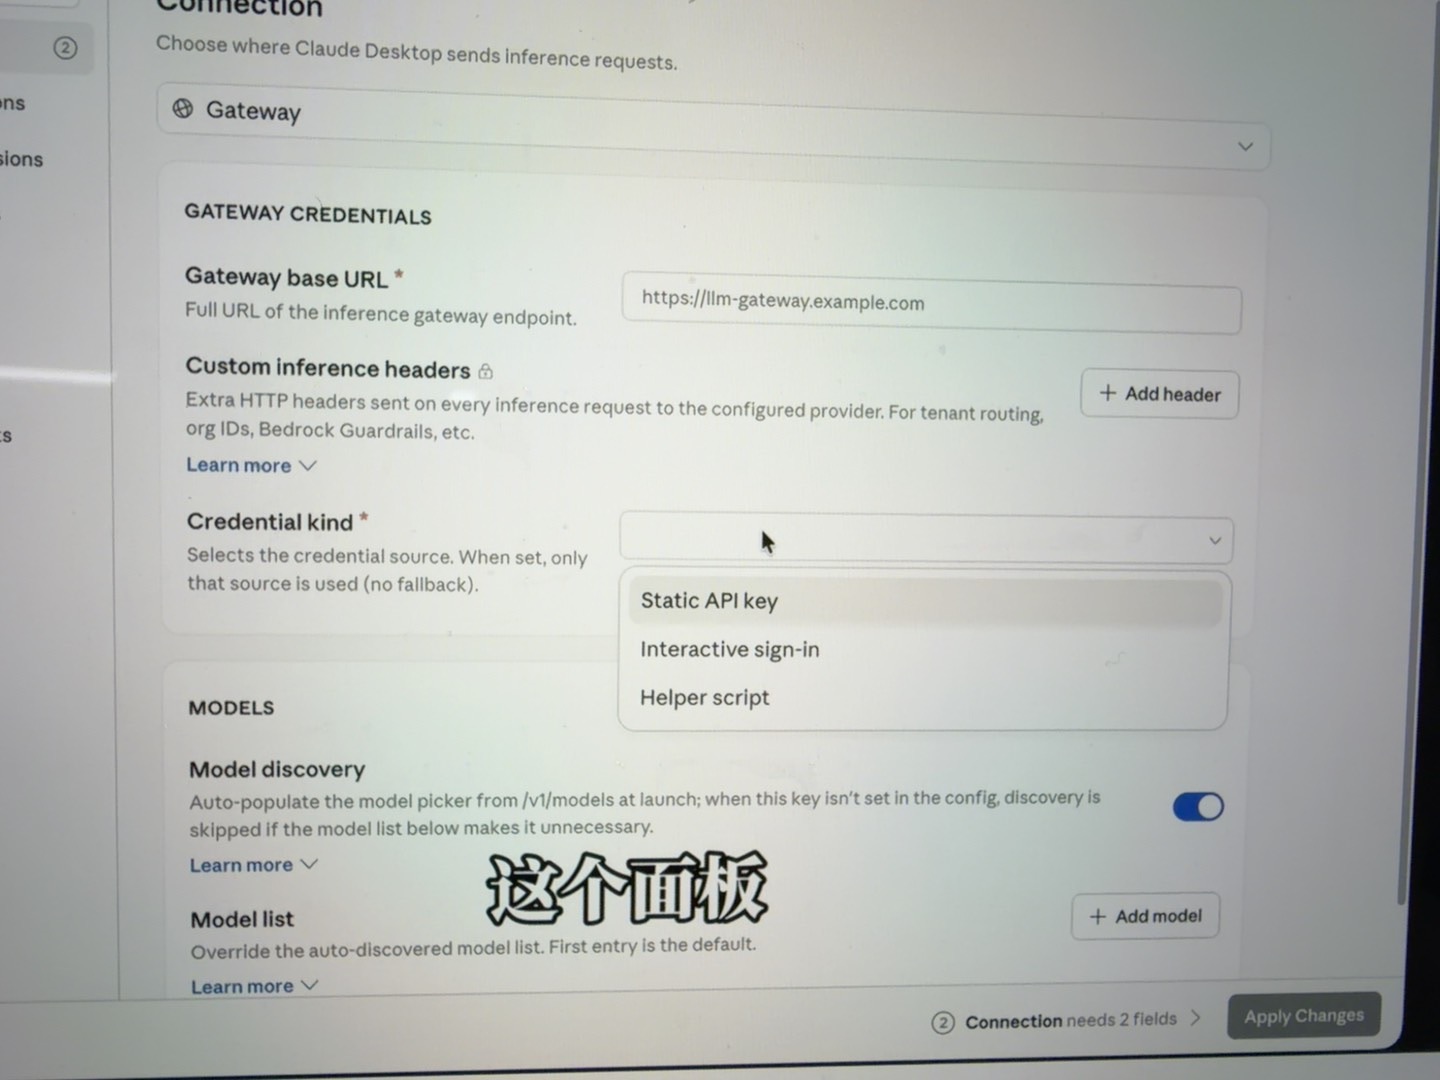
- 重启后点击 Configure Third Party Inference。
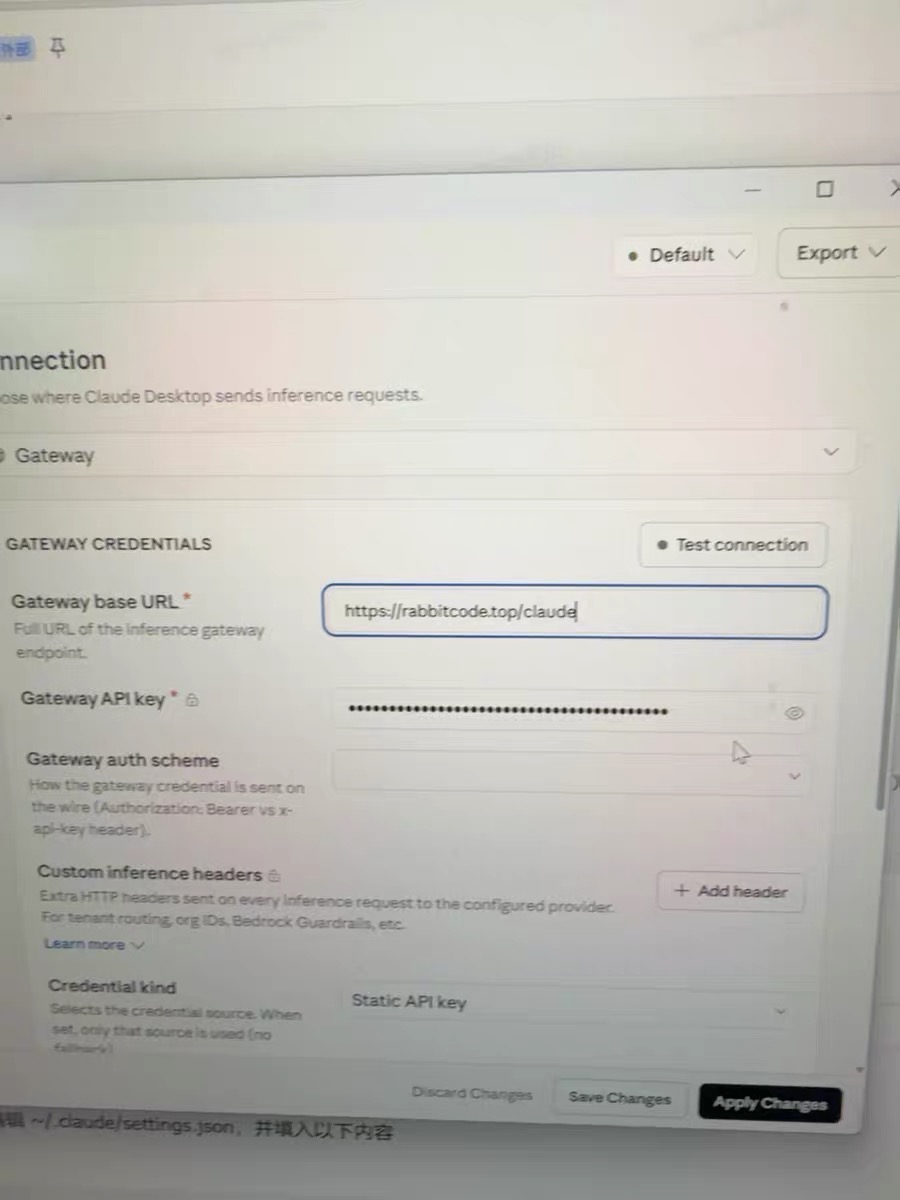
- Credential Kind 选择 Static API Key。
- Base URL 填写
https://rabbitcode.top/claude,API Key 填写本站创建的密钥,然后执行 Test Connection。
Claude Code
Claude Code 官方包安装与终端配置
适用系统:macOS 10.15+、Ubuntu 20.04+/Debian 10+、Windows。建议至少 4GB 内存并安装 Node.js 18+。
1. 安装 Claude Code
npm install -g @anthropic-ai/claude-code
claude --version
2. Windows:推荐 settings.json
创建或编辑 C:\\Users\\你的用户名\\.claude\\settings.json:
{
  "env": {
    "ANTHROPIC_AUTH_TOKEN": "替换为您的 API Key",
    "ANTHROPIC_BASE_URL": "https://rabbitcode.top/claude",
    "CLAUDE_CODE_DISABLE_NONESSENTIAL_TRAFFIC": "1"
  }
}
接入只需要端点和密钥配置,不需要授予 Bash 全部命令权限或切换自动批准模式。保留客户端默认权限提示,按具体任务逐项批准。
也可以在 PowerShell 中永久写入环境变量:
[System.Environment]::SetEnvironmentVariable('ANTHROPIC_BASE_URL', 'https://rabbitcode.top/claude', 'User')
[System.Environment]::SetEnvironmentVariable('ANTHROPIC_AUTH_TOKEN', '替换为您的 API Key', 'User')
3. macOS:推荐 settings.json
创建或编辑 ~/.claude/settings.json,内容与上面的 Windows 配置相同。
临时环境变量也可以这样设置:
export ANTHROPIC_BASE_URL="https://rabbitcode.top/claude"
export ANTHROPIC_AUTH_TOKEN="替换为您的 API Key"
4. Linux
临时设置仅对当前终端有效;永久设置可追加到 ~/.bashrc 或 ~/.zshrc:
# Bash
echo 'export ANTHROPIC_BASE_URL="https://rabbitcode.top/claude"' >> ~/.bashrc
echo 'export ANTHROPIC_AUTH_TOKEN="替换为您的 API Key"' >> ~/.bashrc
source ~/.bashrc

# Zsh
echo 'export ANTHROPIC_BASE_URL="https://rabbitcode.top/claude"' >> ~/.zshrc
echo 'export ANTHROPIC_AUTH_TOKEN="替换为您的 API Key"' >> ~/.zshrc
source ~/.zshrc
5. 验证配置
下面只检查当前终端的环境变量是否非空,不检查 Claude Code 从 settings.json 读取的配置,也不验证密钥是否有效。提示 absent in this shell 不代表配置失败;使用配置文件时请在 Claude Code 中运行 /status,核对加载状态与服务地址。修改后重启客户端。
不要输出完整密钥或将其提交到代码仓库、截图、日志或客服消息中。只在本机用户配置中填写,避免命令历史保存密钥。ANTHROPIC_API_KEY 与 ANTHROPIC_AUTH_TOKEN 使用不同认证头,不应视为可互换,也不要同时设置;需以服务端确认支持的认证方式为准。
# macOS / Linux: current shell only; does not read settings.json
if [ -n "$ANTHROPIC_BASE_URL" ]; then echo "Base URL: set in this shell"; else echo "Base URL: absent in this shell"; fi
if [ -n "$ANTHROPIC_AUTH_TOKEN" ]; then echo "AUTH_TOKEN: set in this shell"; else echo "AUTH_TOKEN: absent in this shell"; fi
if [ -n "$ANTHROPIC_API_KEY" ]; then echo "API_KEY: set in this shell"; else echo "API_KEY: absent in this shell"; fi

# Windows PowerShell: current process only; does not read settings.json
foreach ($name in 'ANTHROPIC_BASE_URL','ANTHROPIC_AUTH_TOKEN','ANTHROPIC_API_KEY') {
  if ([Environment]::GetEnvironmentVariable($name, 'Process')) { "$name : set in this shell" } else { "$name : absent in this shell" }
}

# Windows CMD: current process only; does not read settings.json
if defined ANTHROPIC_BASE_URL (echo Base URL: set in this shell) else (echo Base URL: absent in this shell)
if defined ANTHROPIC_AUTH_TOKEN (echo AUTH_TOKEN: set in this shell) else (echo AUTH_TOKEN: absent in this shell)
if defined ANTHROPIC_API_KEY (echo API_KEY: set in this shell) else (echo API_KEY: absent in this shell)
Third-party clients
第三方客户端配置
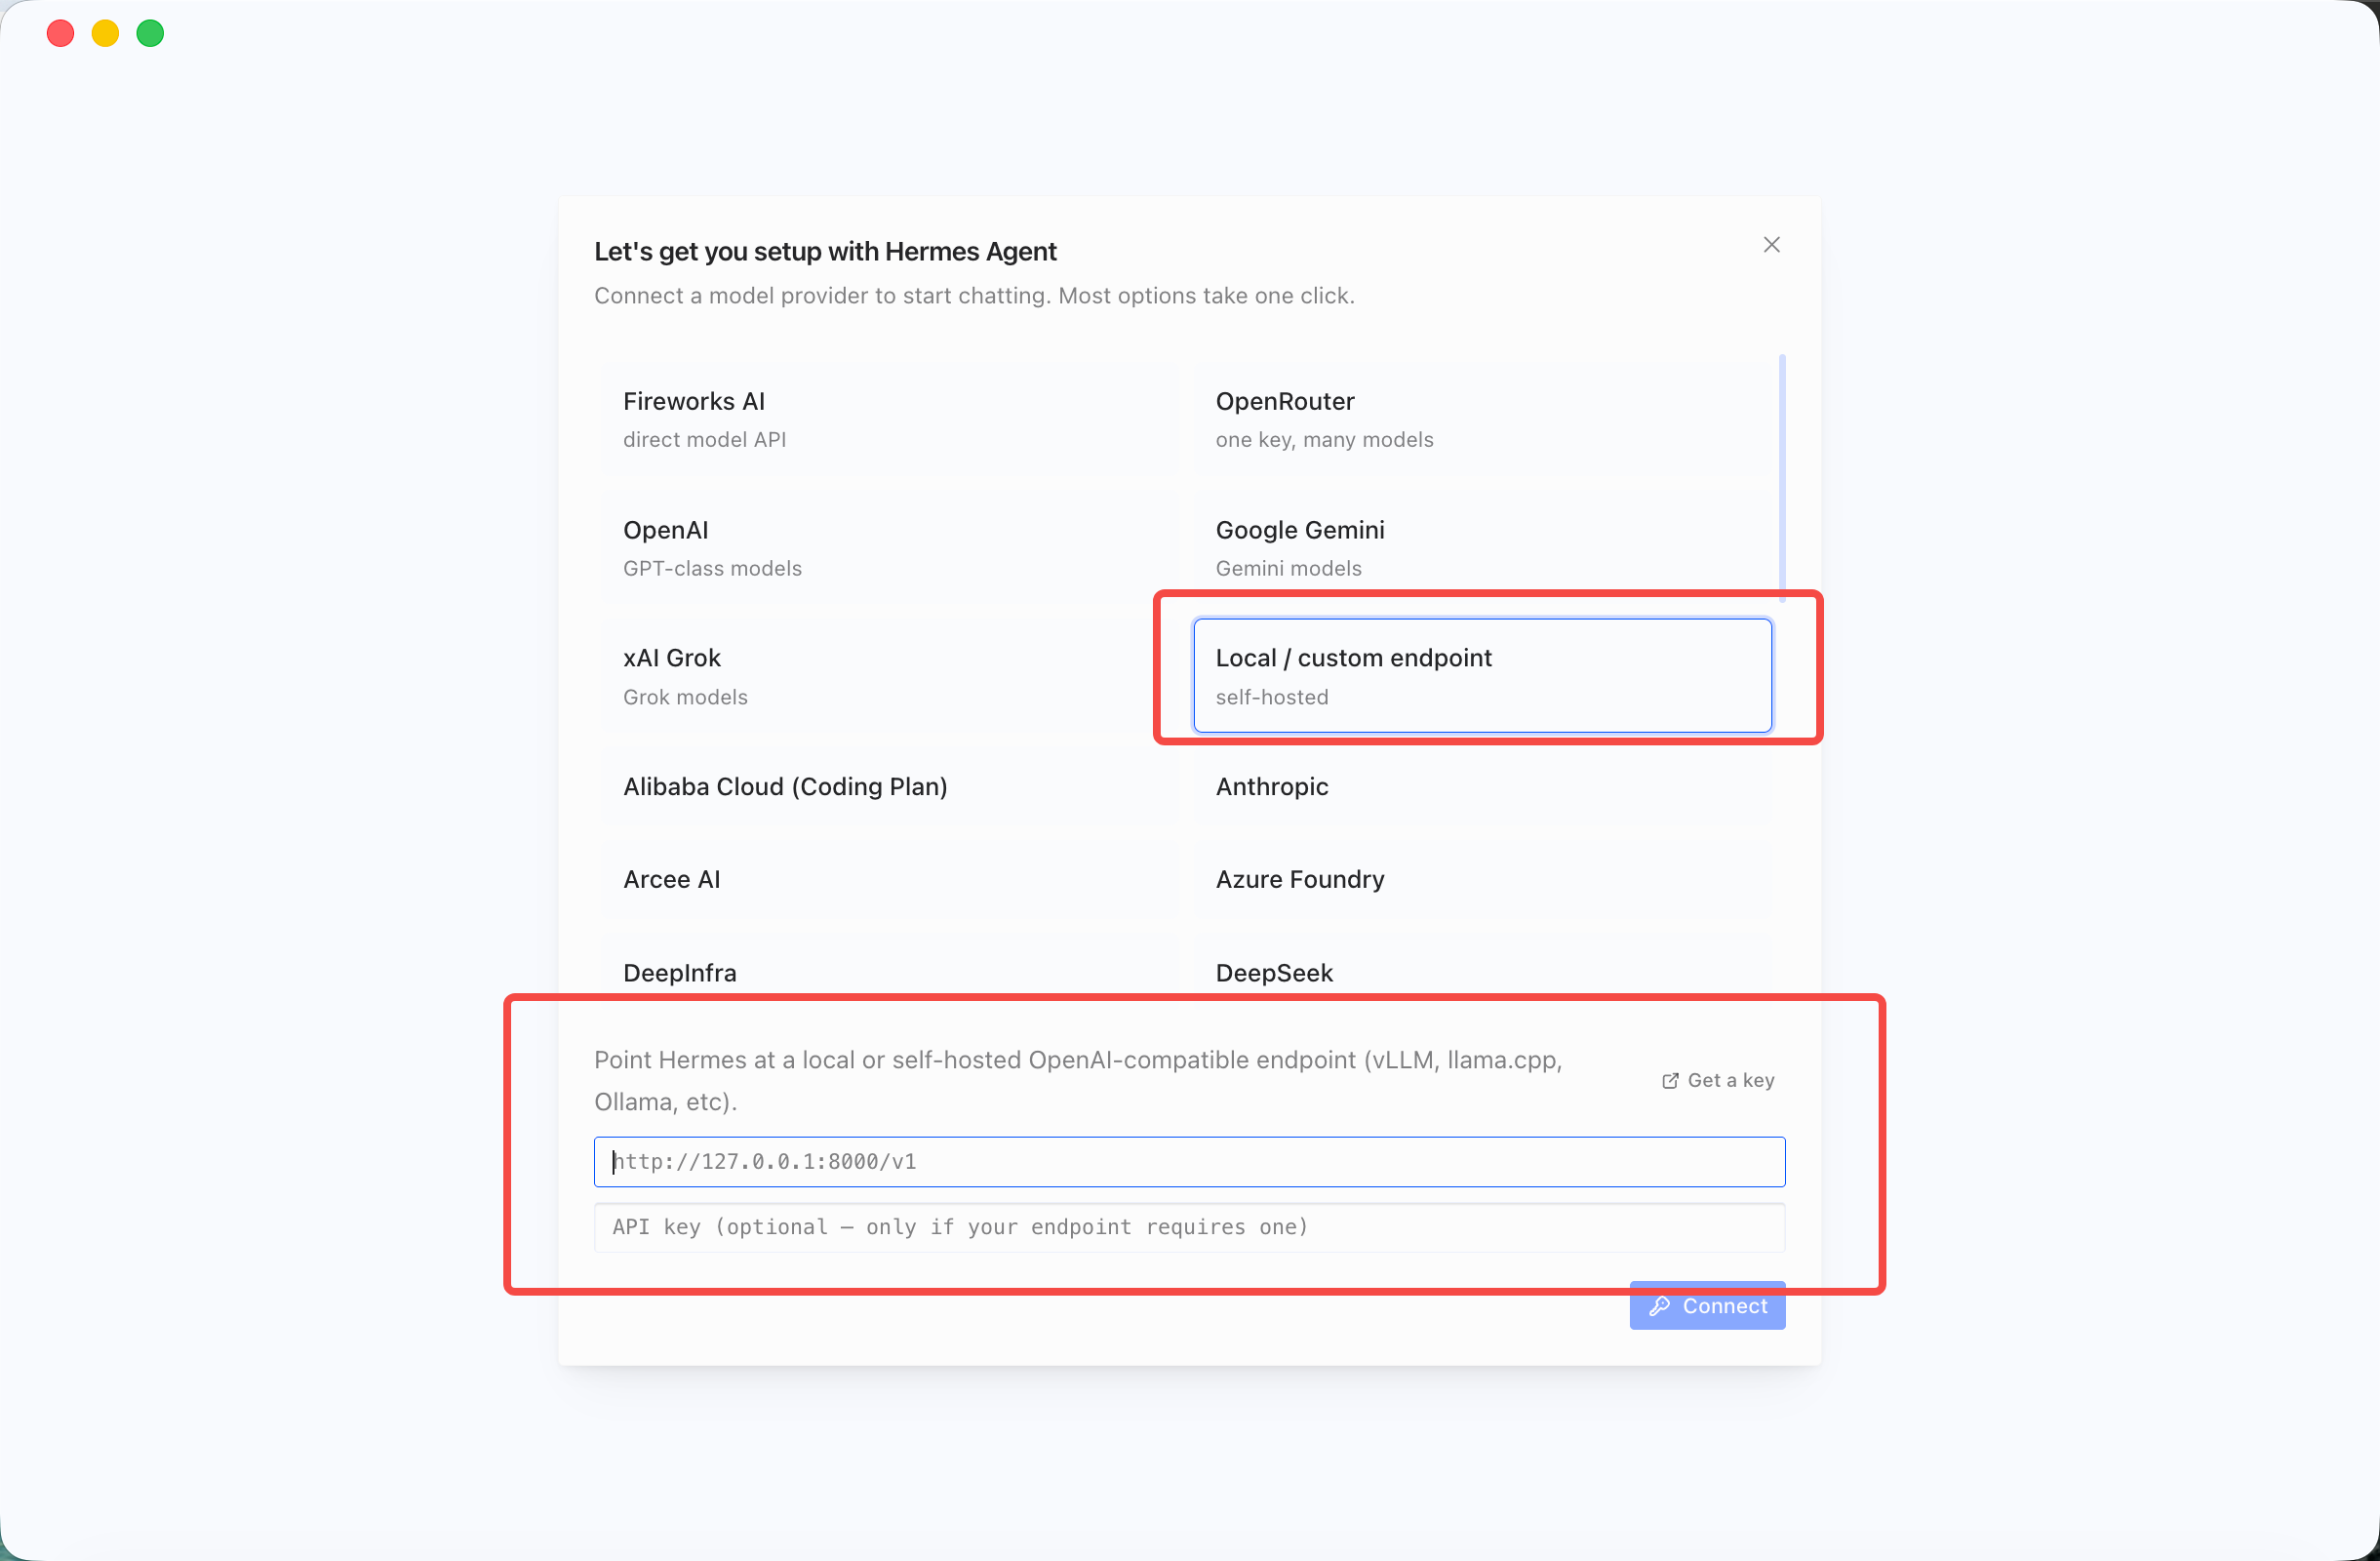
Hermes / 爱马仕
自定义地址:https://rabbitcode.top/claude/v1
API Key:使用 RabbitCode 站点生成的密钥。
模型可在客户端中按需切换。
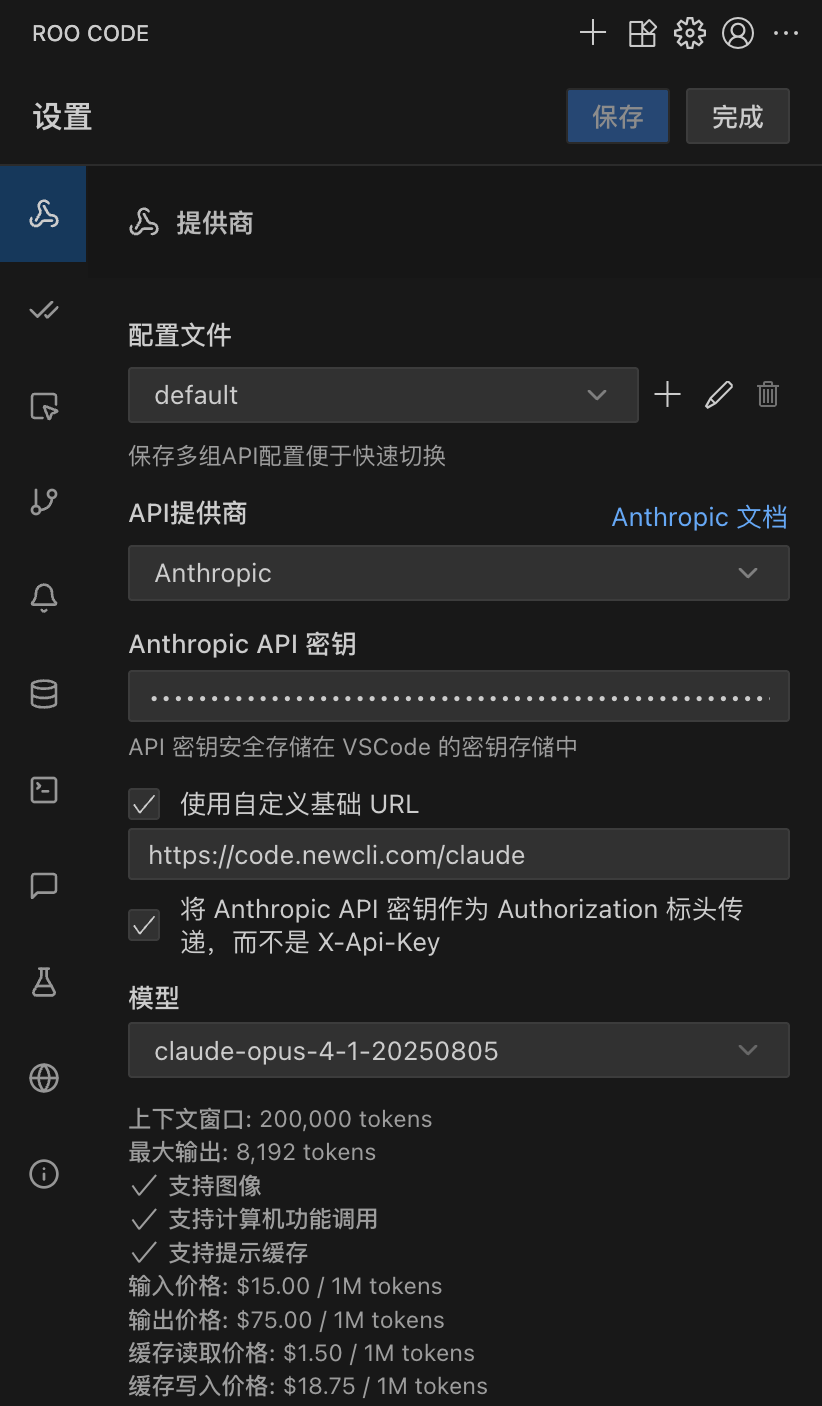
Roo Code / Kilo Code
API 供应商选择 Anthropic。
自定义基础 URL:https://rabbitcode.top/claude
填写本站 API Key,再选择受支持的模型 ID。
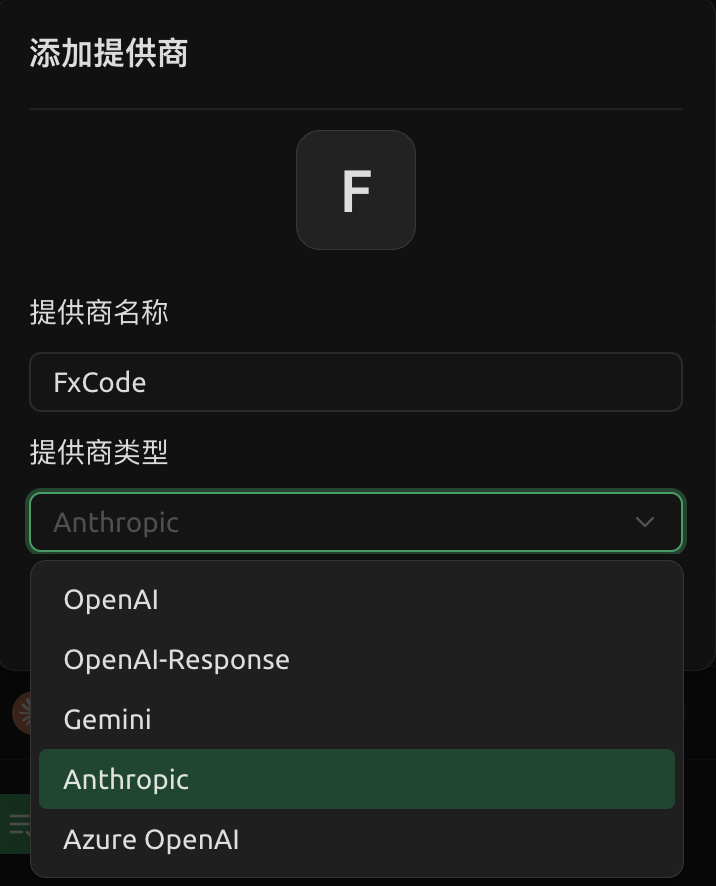
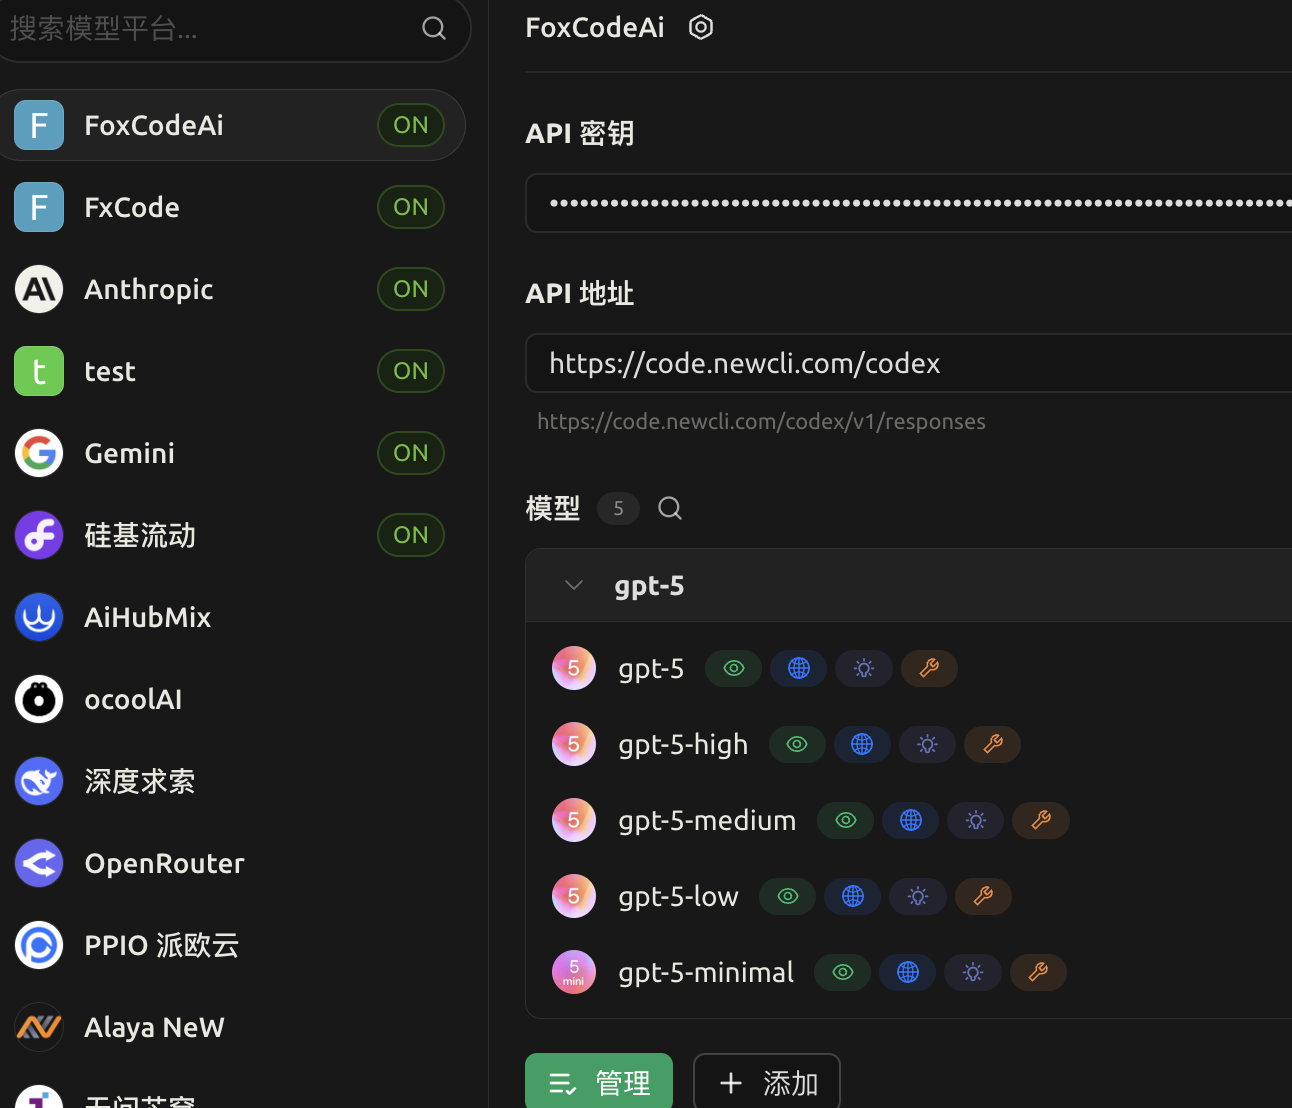
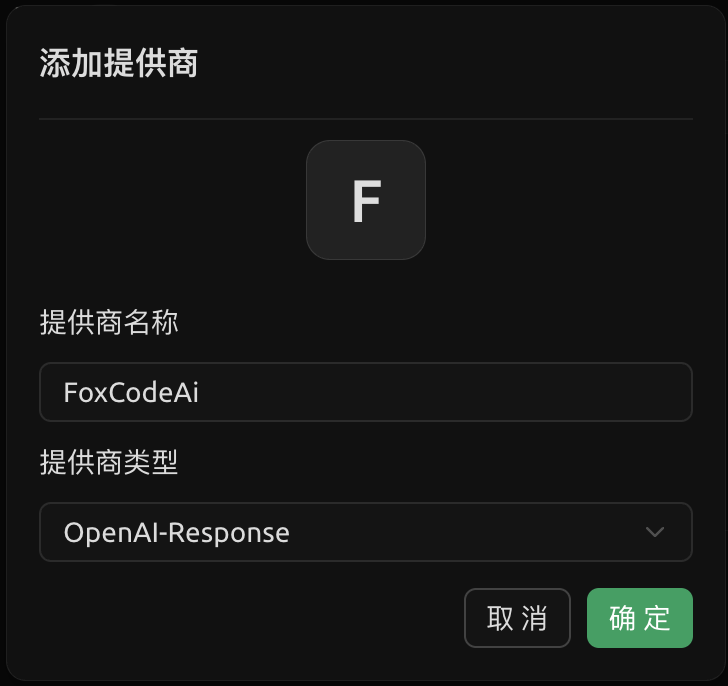
Cherry Studio
新增供应商,类型选择 Anthropic。
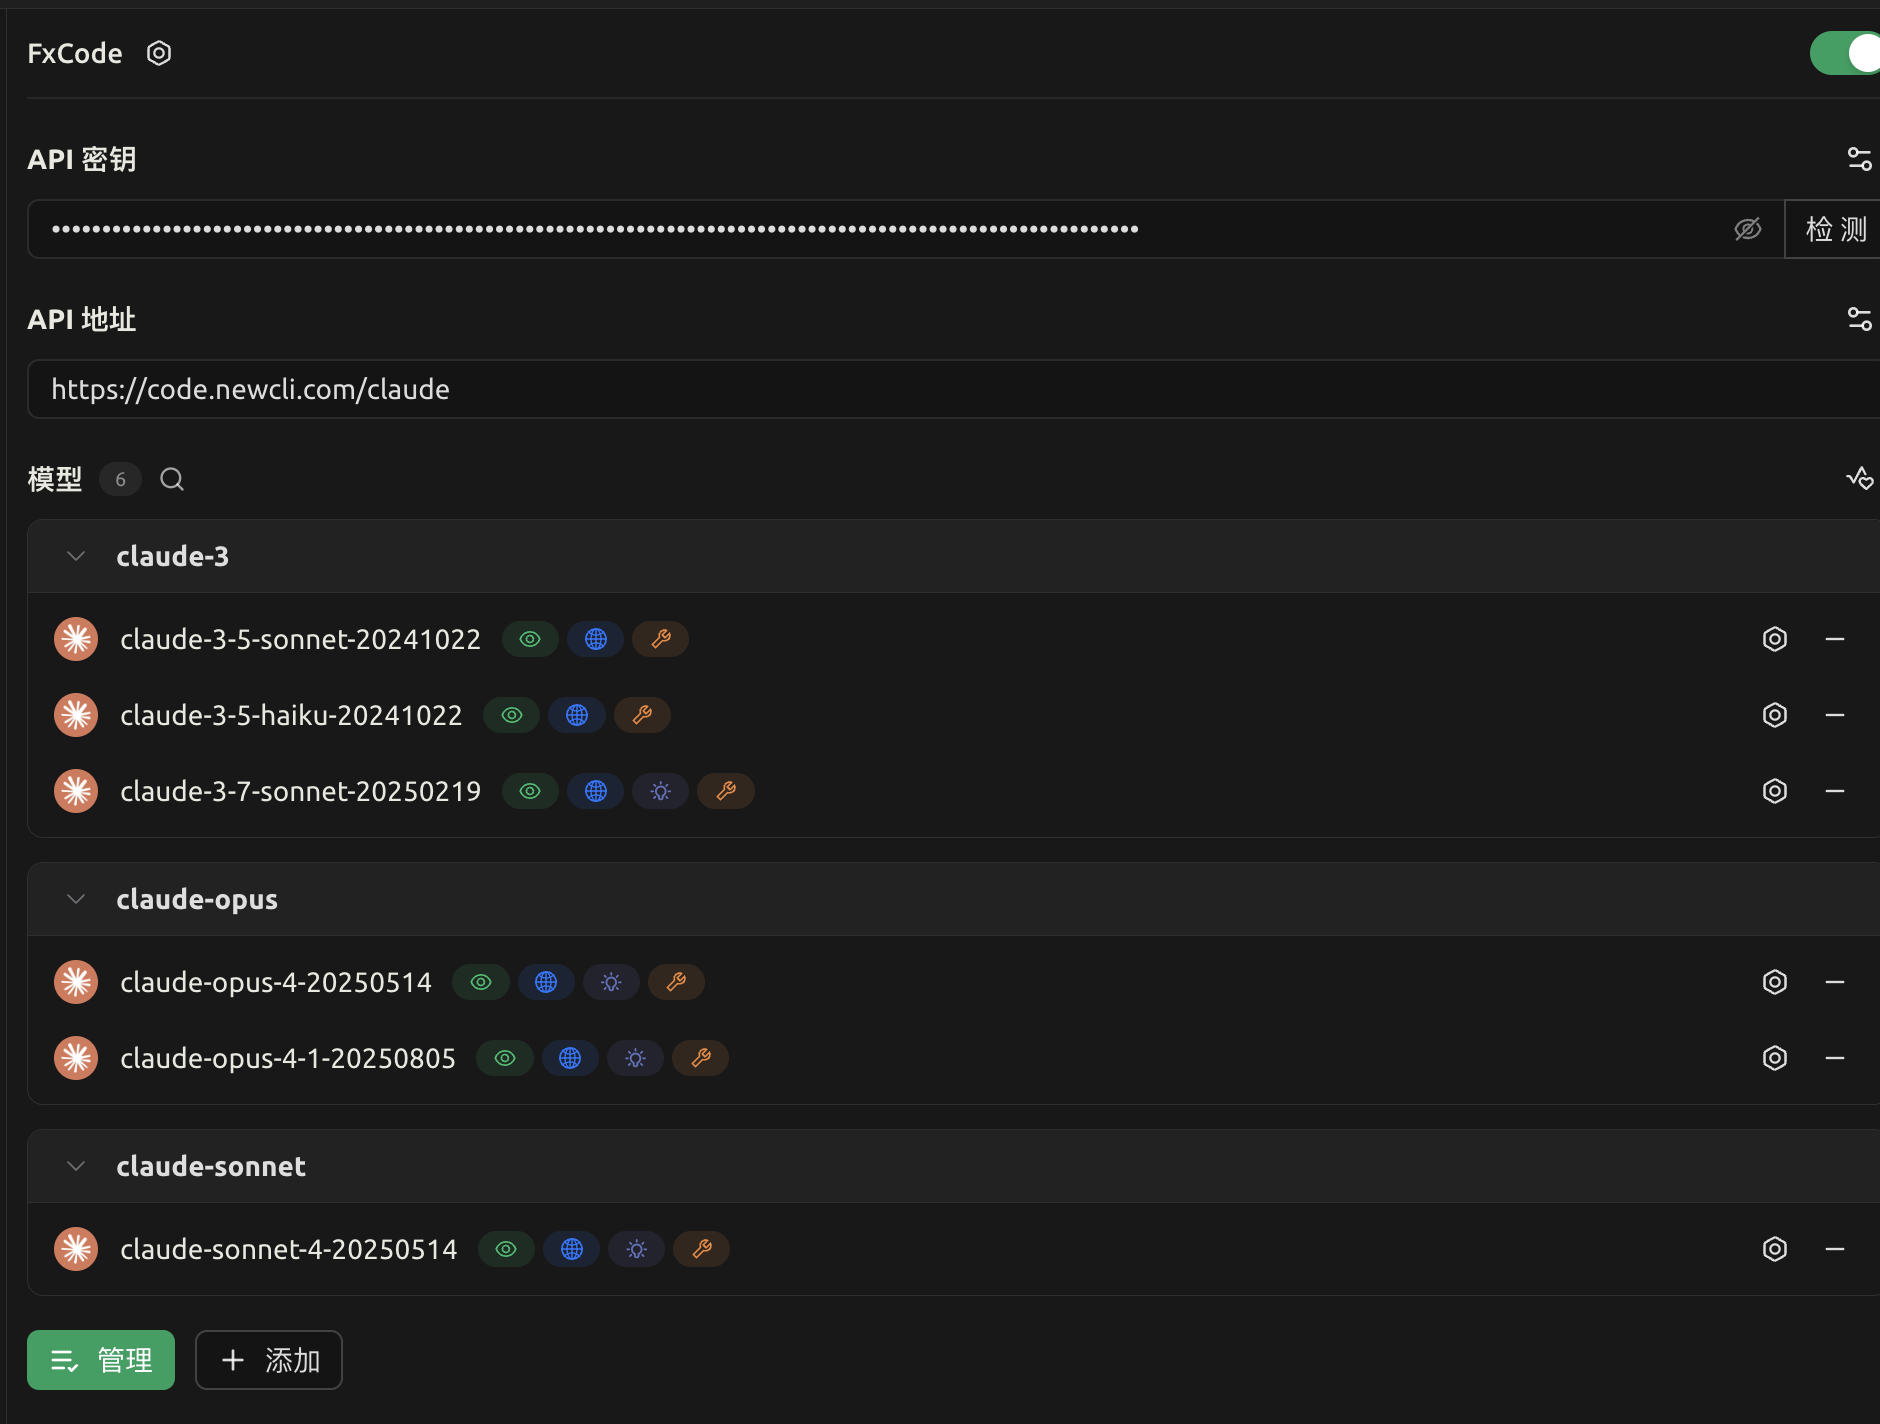
API 地址:https://rabbitcode.top/claude
填写密钥后点击“管理”,拉取模型并加入列表。
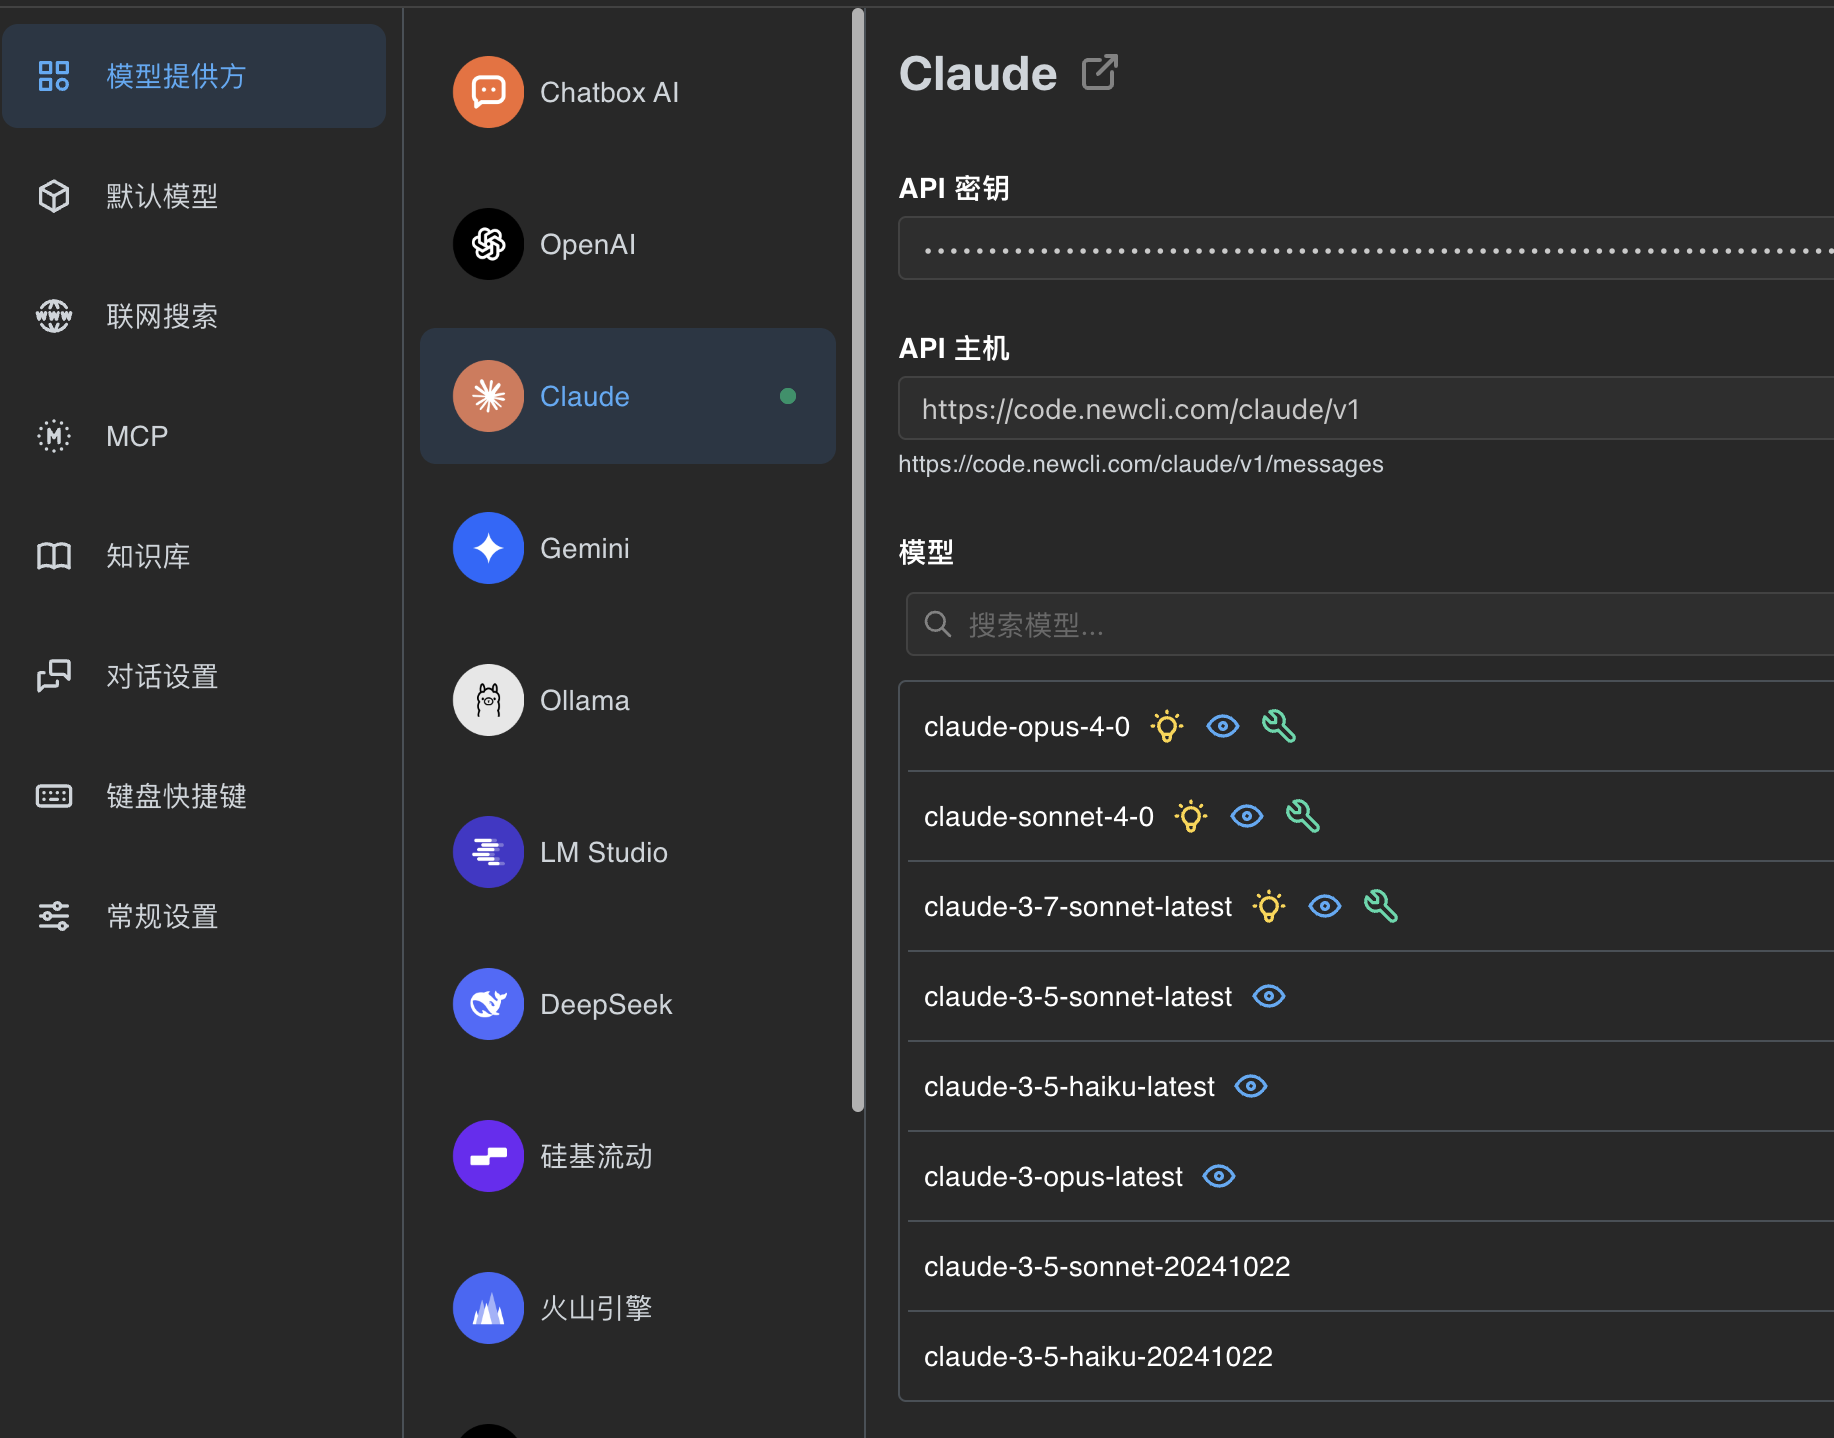
ChatBox
模型提供方选择 Claude。
API 地址:https://rabbitcode.top/claude/v1
填写密钥并选择模型;这里以文字地址为准。
VS Code Claude Code 插件
先在本机 Claude Code 中完成环境配置,再安装官方 Claude Code 插件。
插件设置中开启 Disable Login,即可直接使用已有配置。
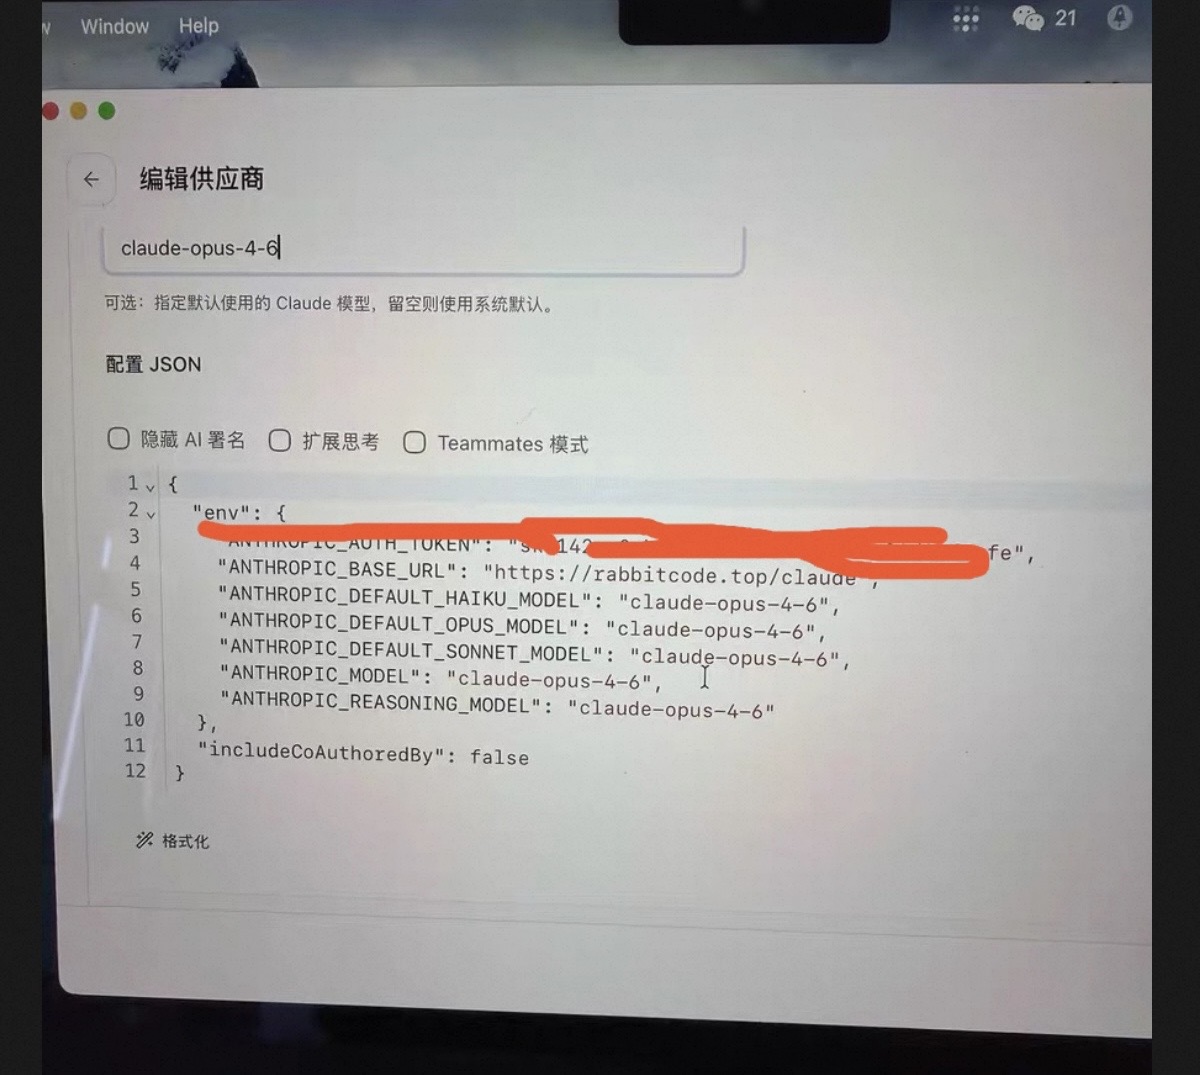
CC Switch
Base URL 使用 https://rabbitcode.top/claude。
API Key 使用本站生成的密钥,模型从上方支持列表中选择。
Codex
Codex 安装与配置
1. 安装 Codex
npm install -g @openai/codex2. 配置 ~/.codex/config.toml
model_provider = "fox"
model = "claude-fable-5-1"
model_reasoning_effort = "high"
disable_response_storage = true

[model_providers.fox]
name = "fox"
base_url = "https://rabbitcode.top/claude/v1"
wire_api = "responses"
requires_openai_auth = true
3. 配置 ~/.codex/auth.json
{
  "OPENAI_API_KEY": "替换为您的 API Key"
}
4. 启动或切换模型
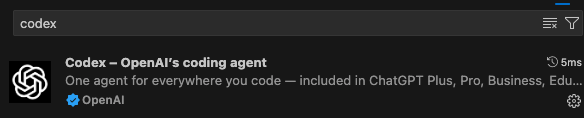
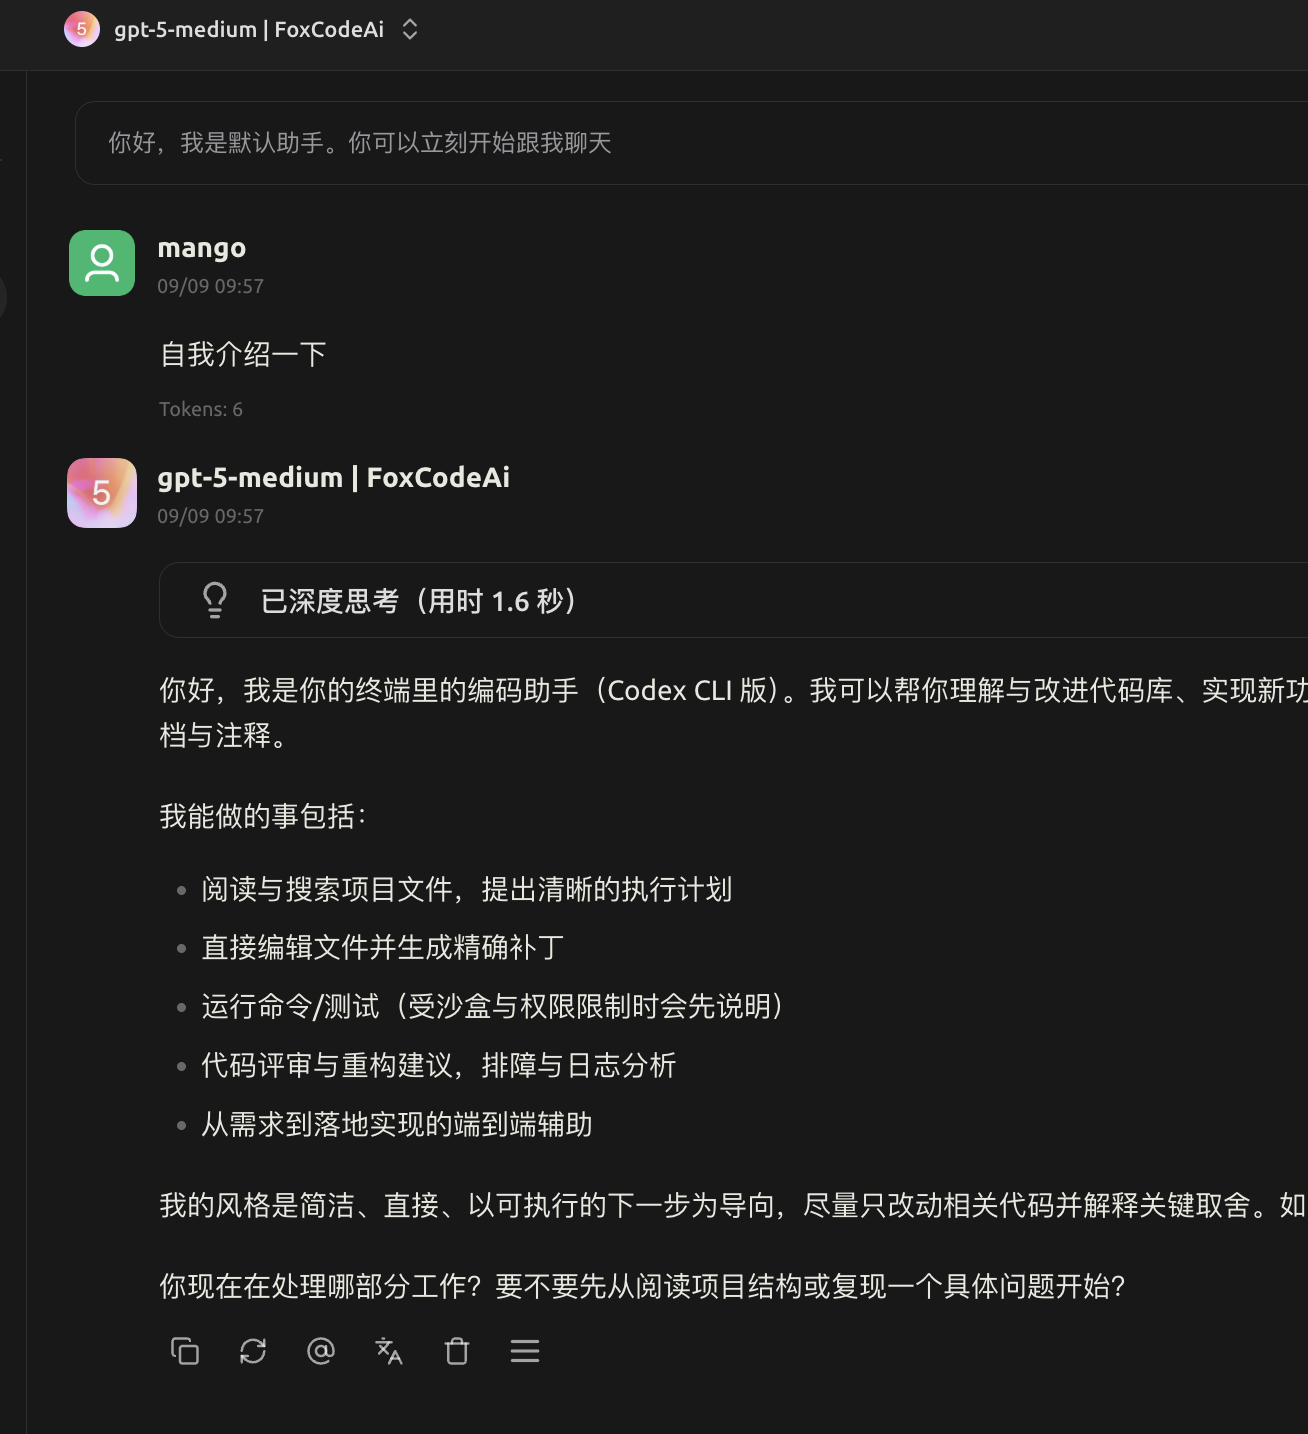
codex -m claude-fable-5-1配置生效后也可以安装 Codex 官方 VS Code 插件。兼容接口同时支持 /v1/chat/completions,可供 Cherry Studio、Roo Code 和 Kilo Code 调用。
Gemini CLI
Gemini CLI 配置(暂未支持)
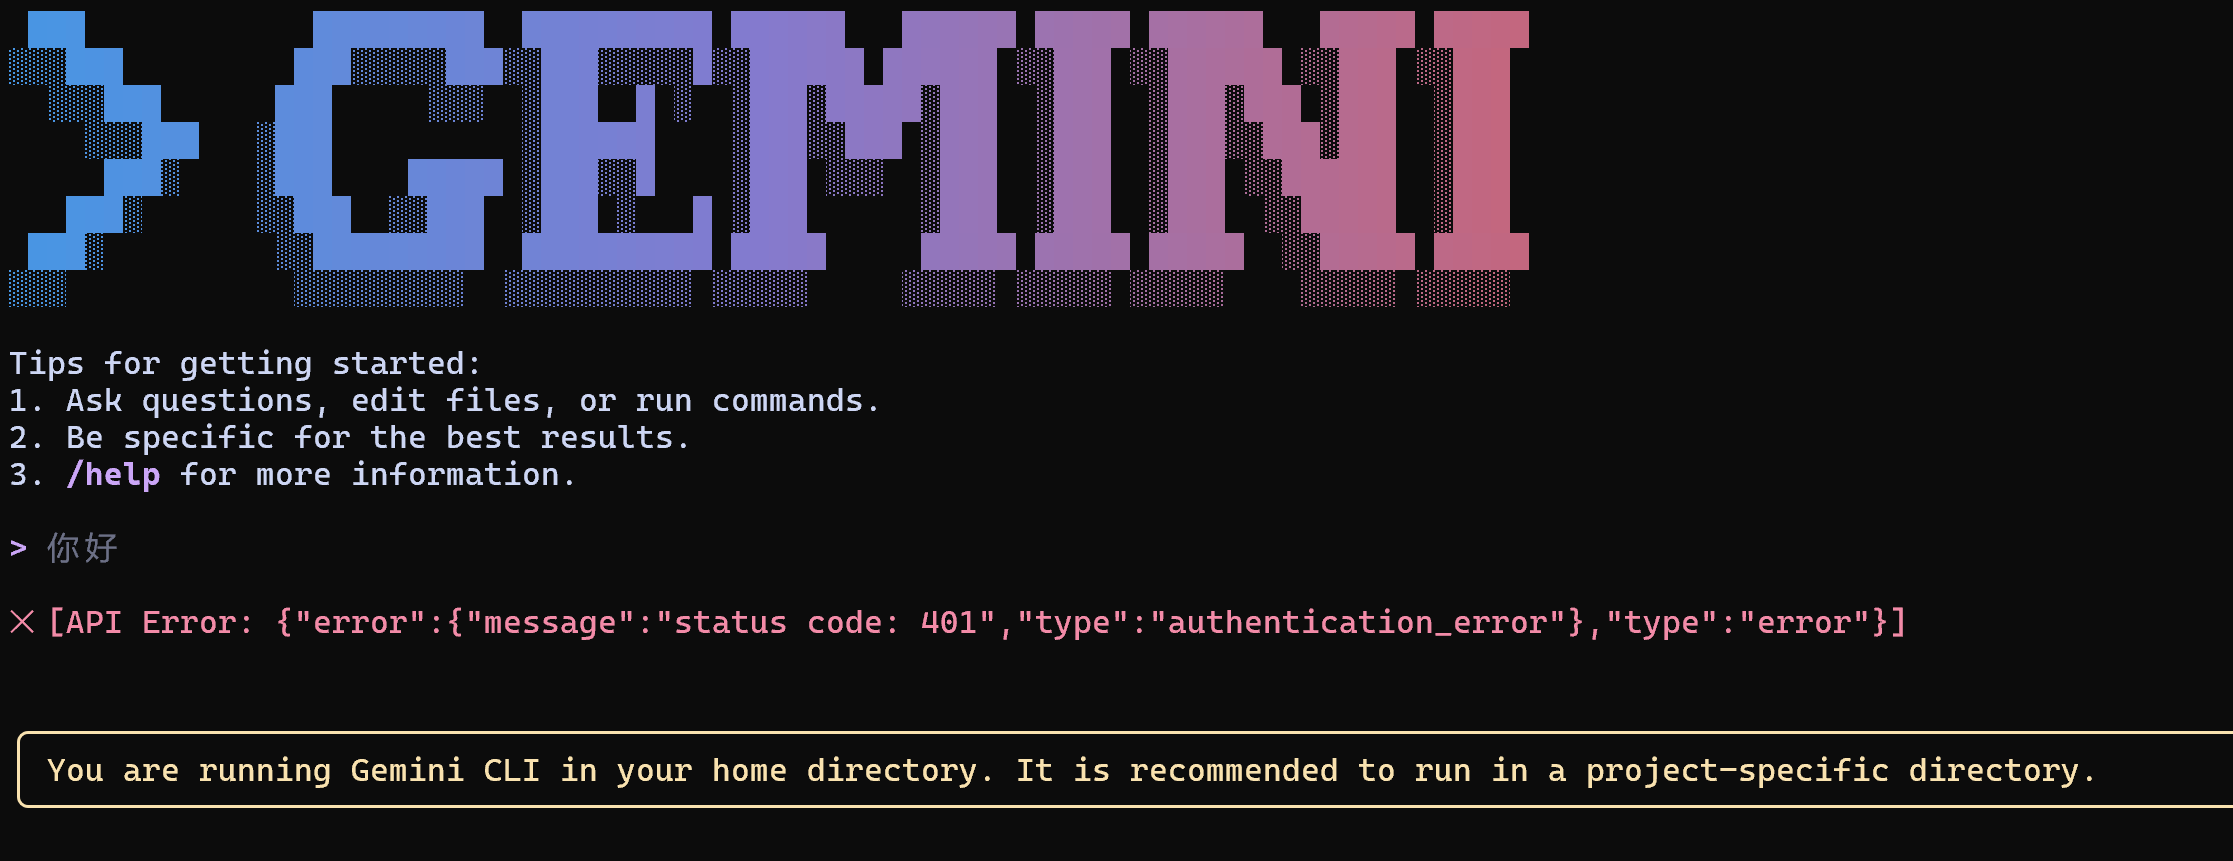
以下内容保留供后续兼容完成后使用,当前请不要把它当作已开放能力。
npm install -g @google/gemini-cli编辑 ~/.gemini/.env:
GOOGLE_GEMINI_BASE_URL=https://rabbitcode.top/gemini
GEMINI_API_KEY=你的APIKey
编辑或创建 ~/.gemini/settings.json:
{
  "ide": { "enabled": true },
  "security": {
    "auth": { "selectedType": "gemini-api-key" }
  }
}
如果后续开放后遇到 401,可在 Gemini CLI 内输入 /auth 并重新填写 Key。
Claude Code guide
Claude Code 常用功能与技巧
直接交互
claude
claude "解释这个项目"
claude -p "这个函数做什么?"
cat logs.txt | claude -p "分析这些错误"
恢复会话
claude --continue
claude --resume
--continue 恢复最近一次会话;--resume 打开会话选择器。
压缩上下文
/compact [instructions]长对话可主动压缩上下文,减少后续 Token 消耗。
连接 IDE
支持 VS Code 与 JetBrains。VS Code 通常会在内置终端启动 Claude Code 时自动安装插件。
需要手动指定 IDE 时,在 Claude Code 内输入 /ide。
Cursor 与 WSL
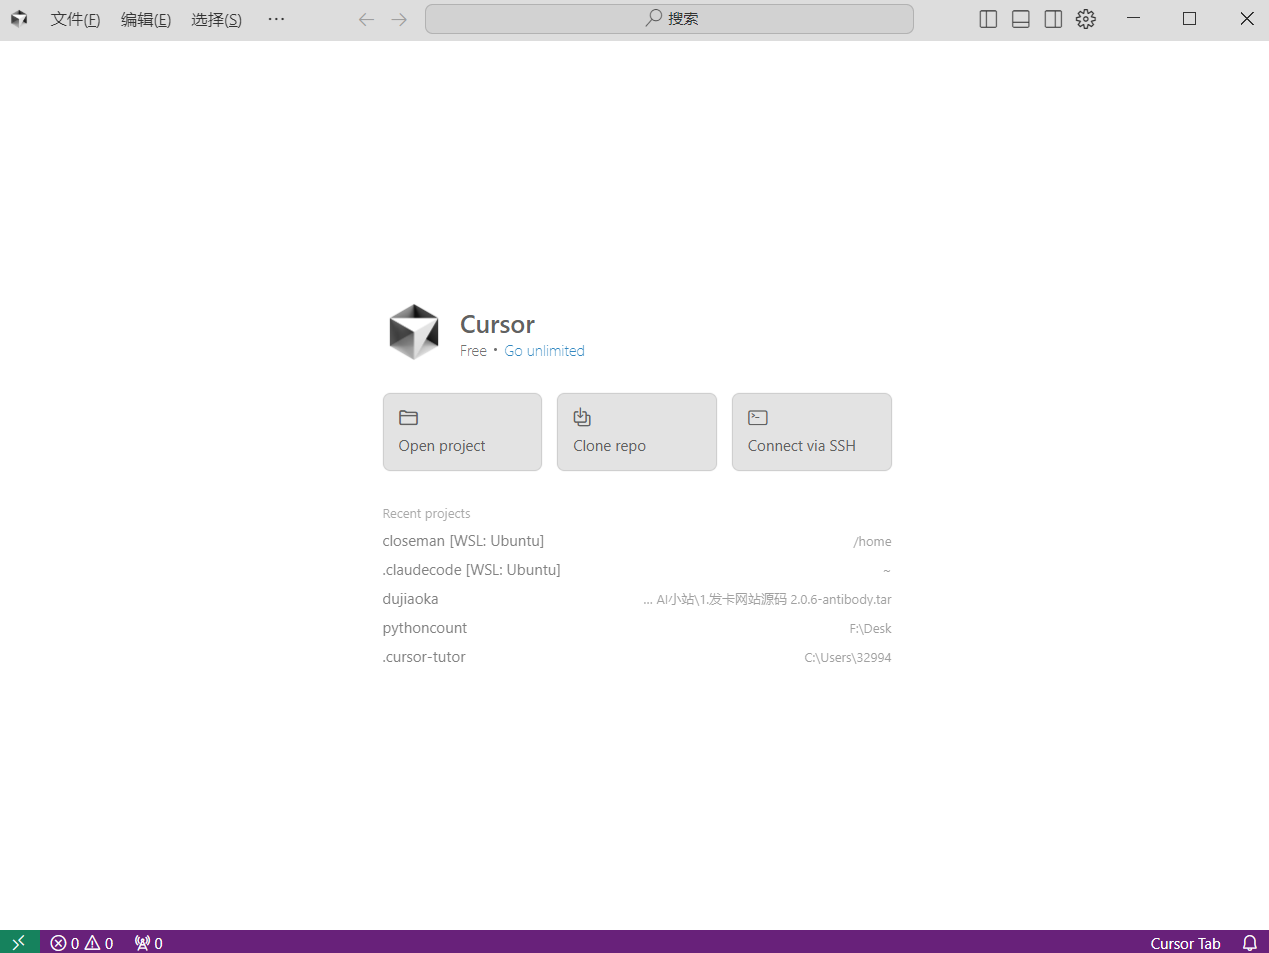
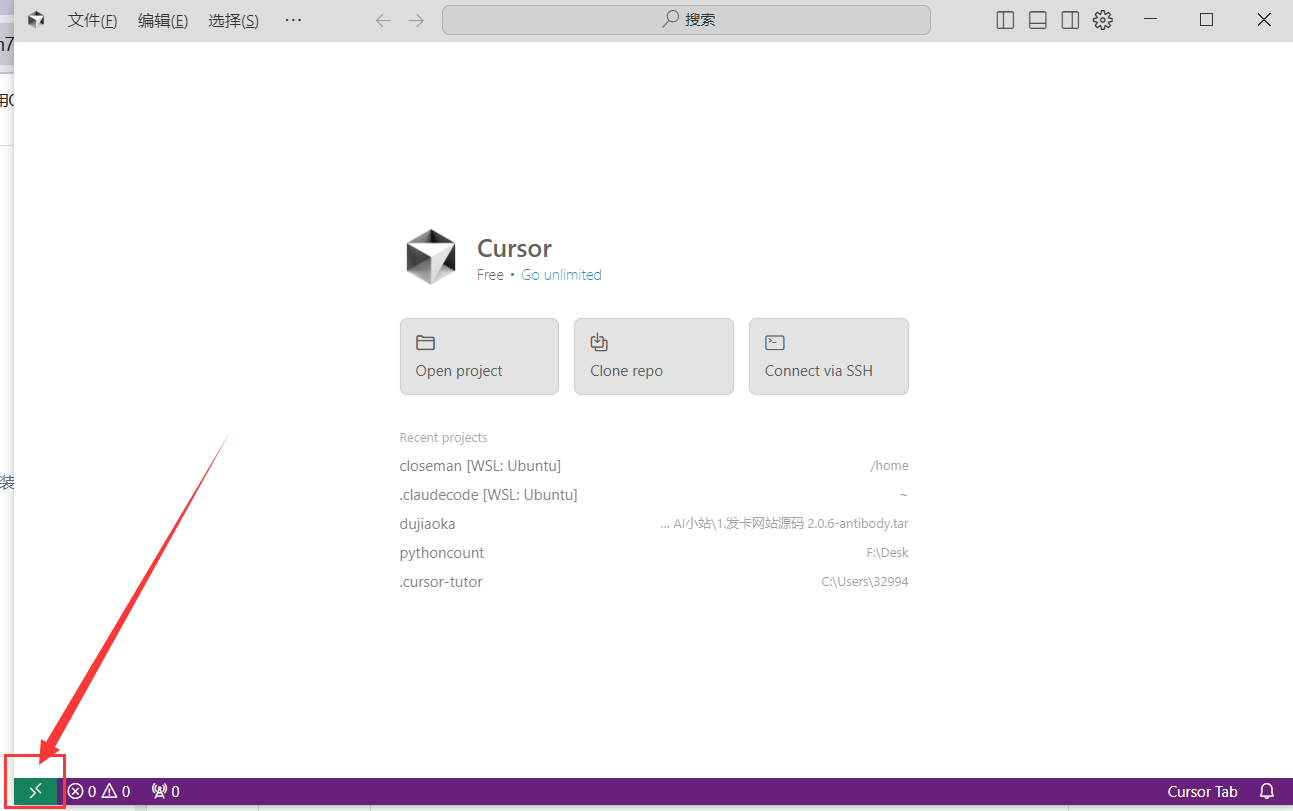
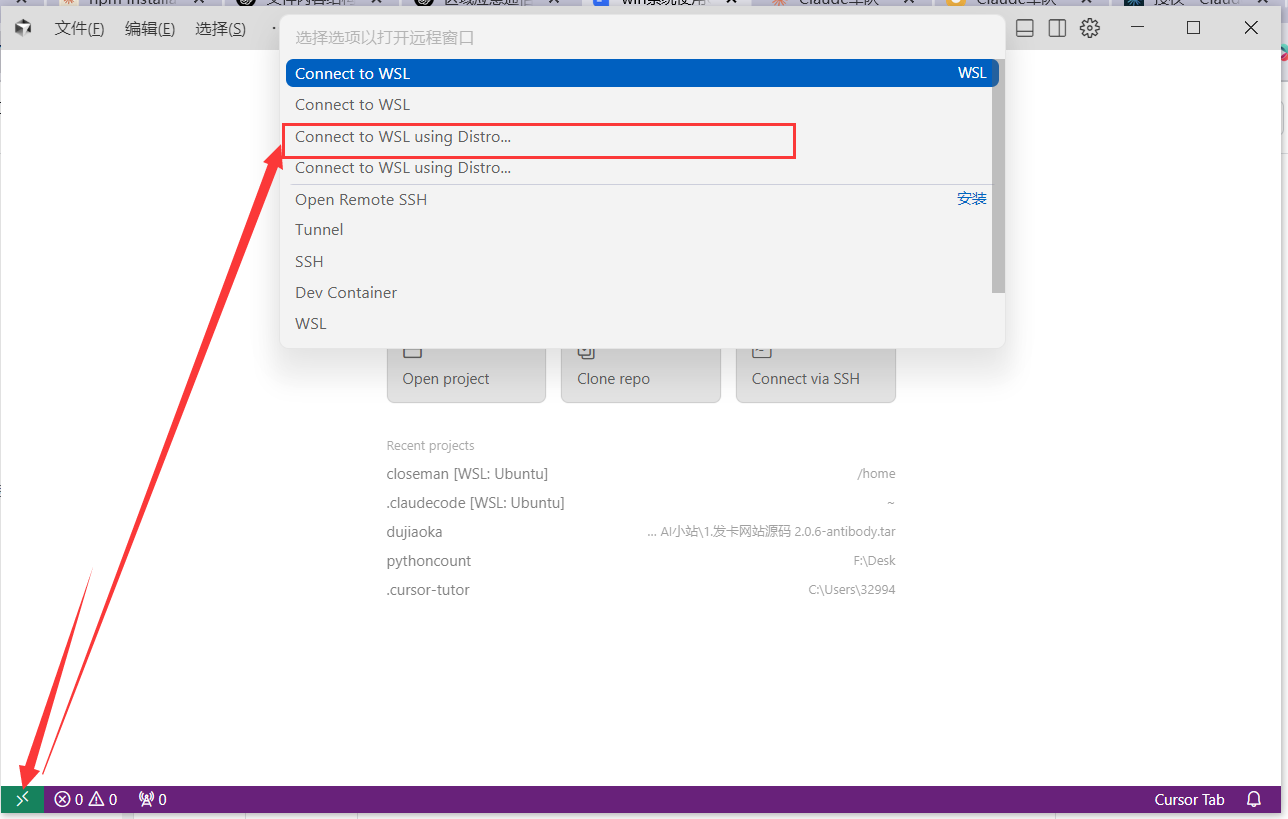
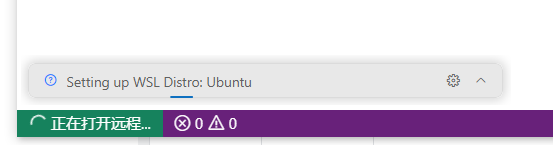
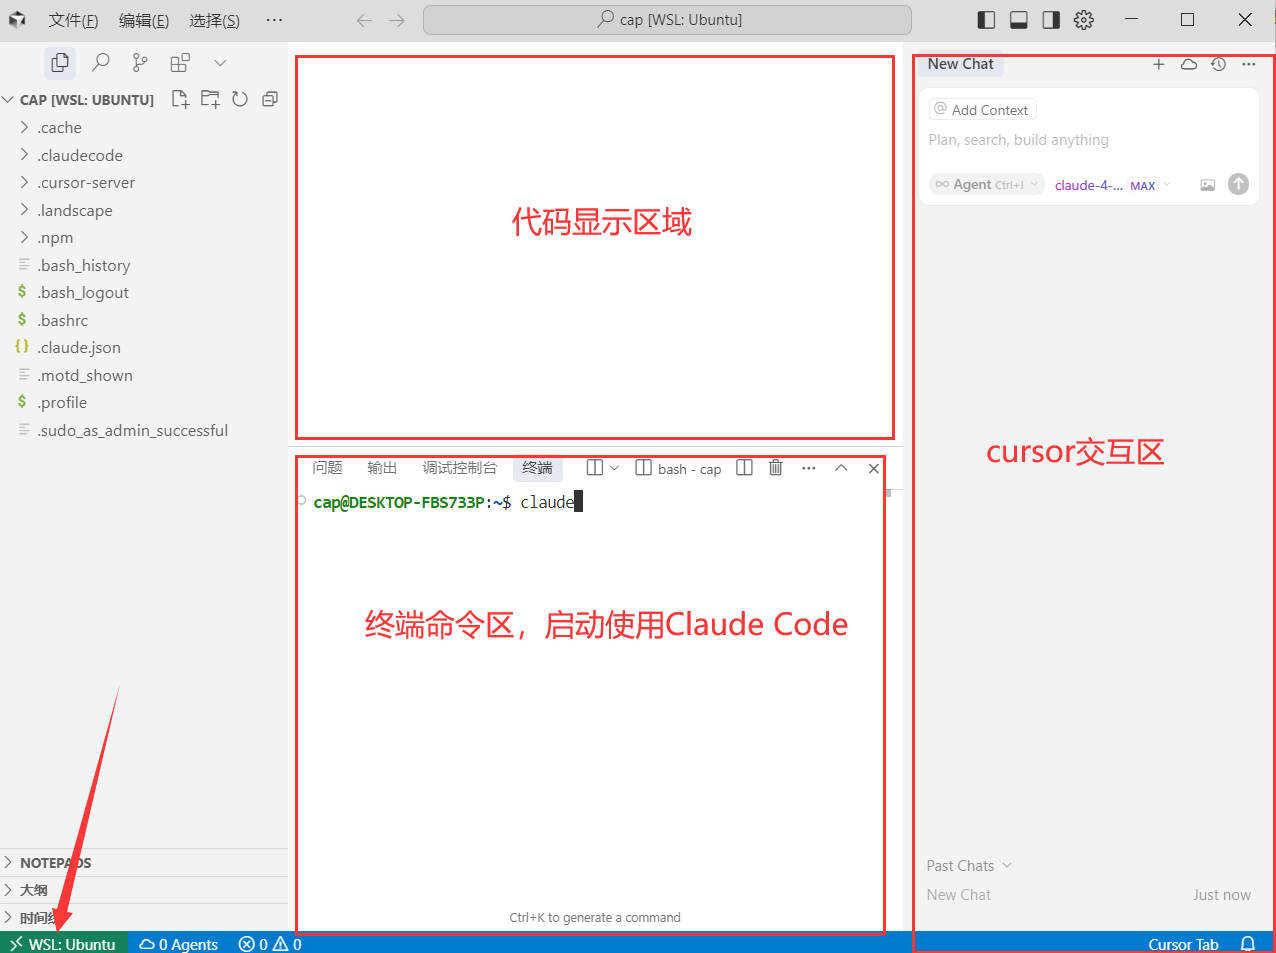
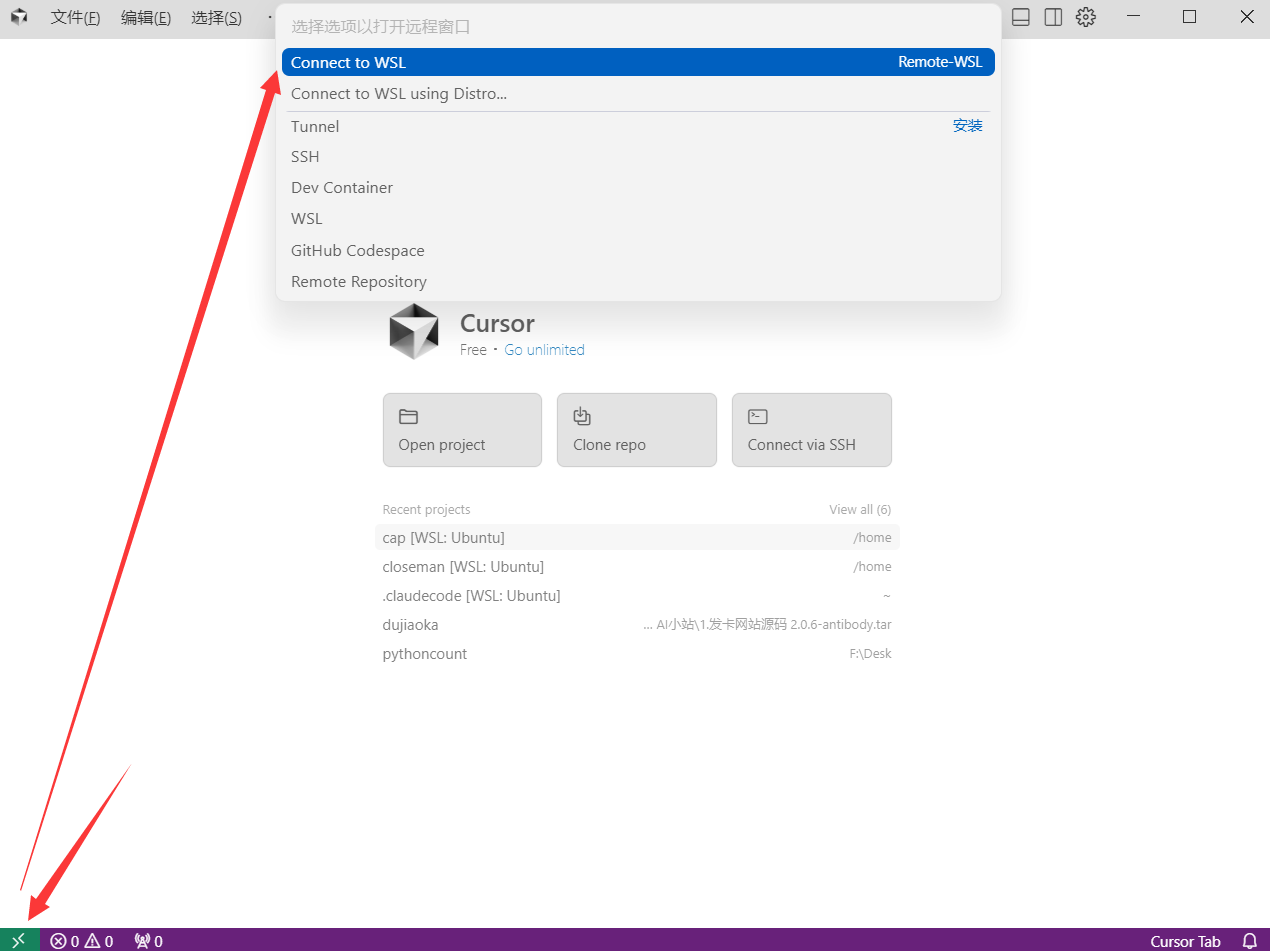
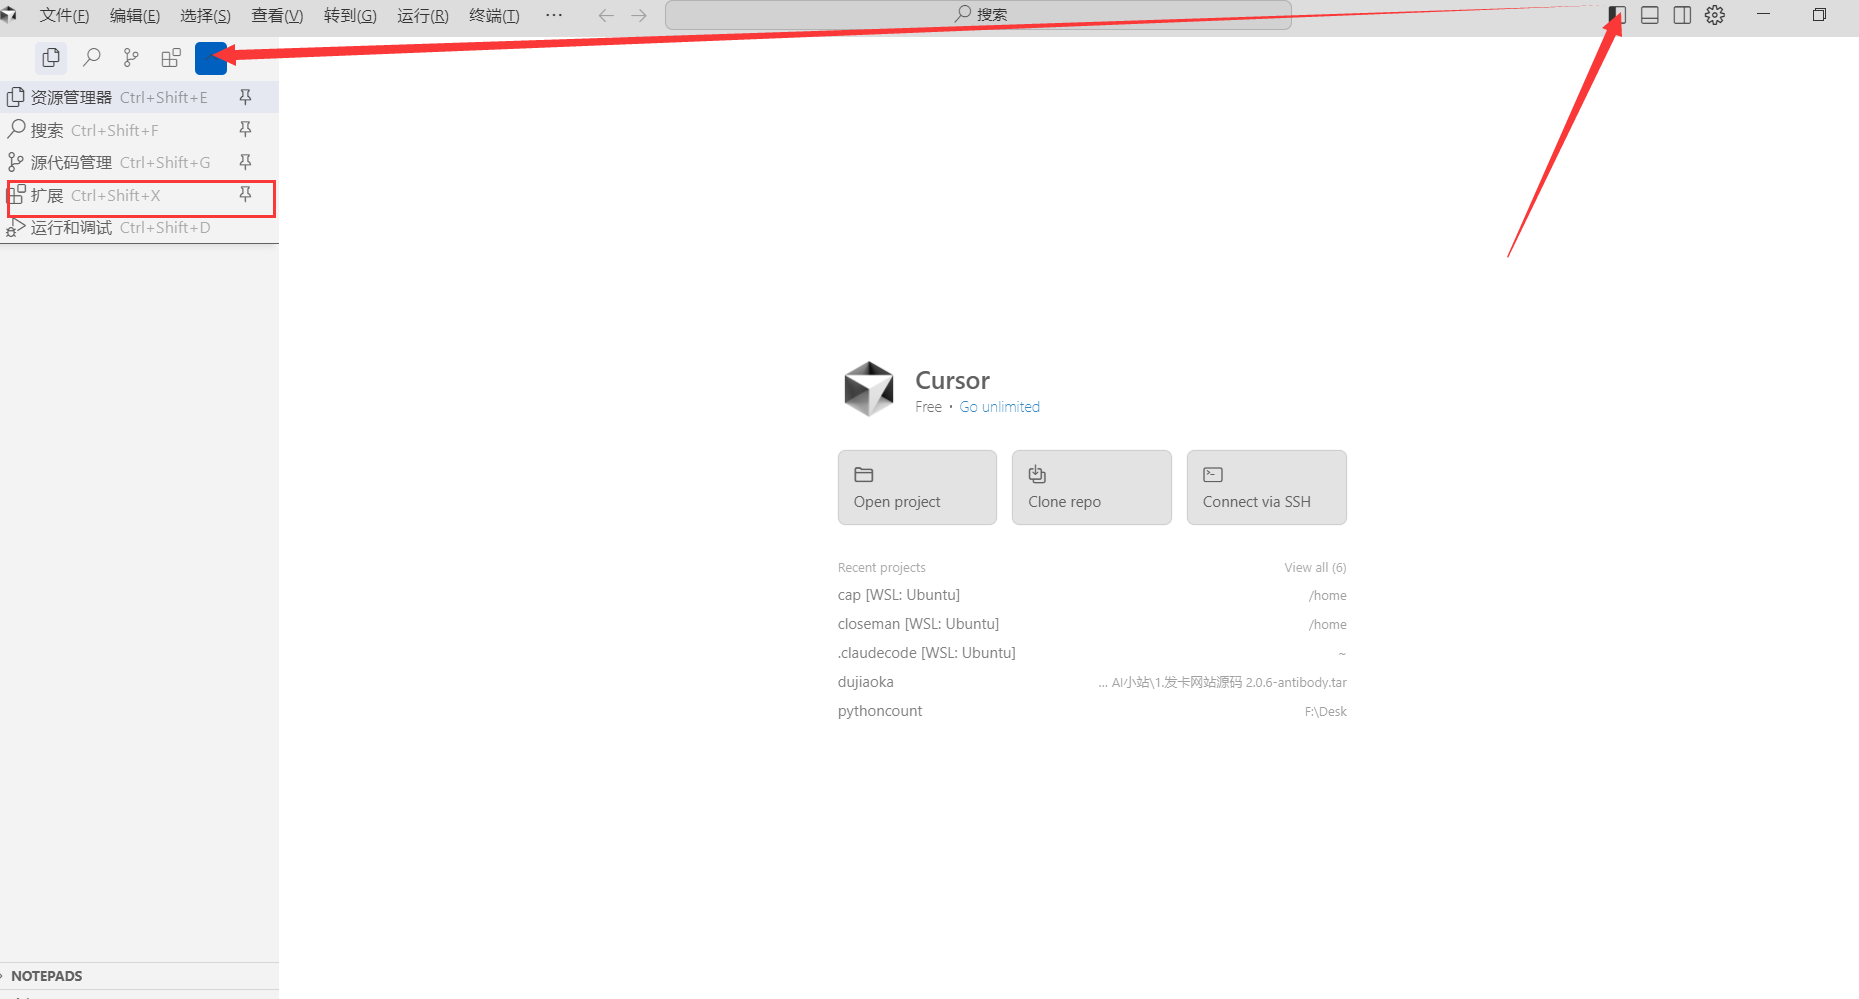
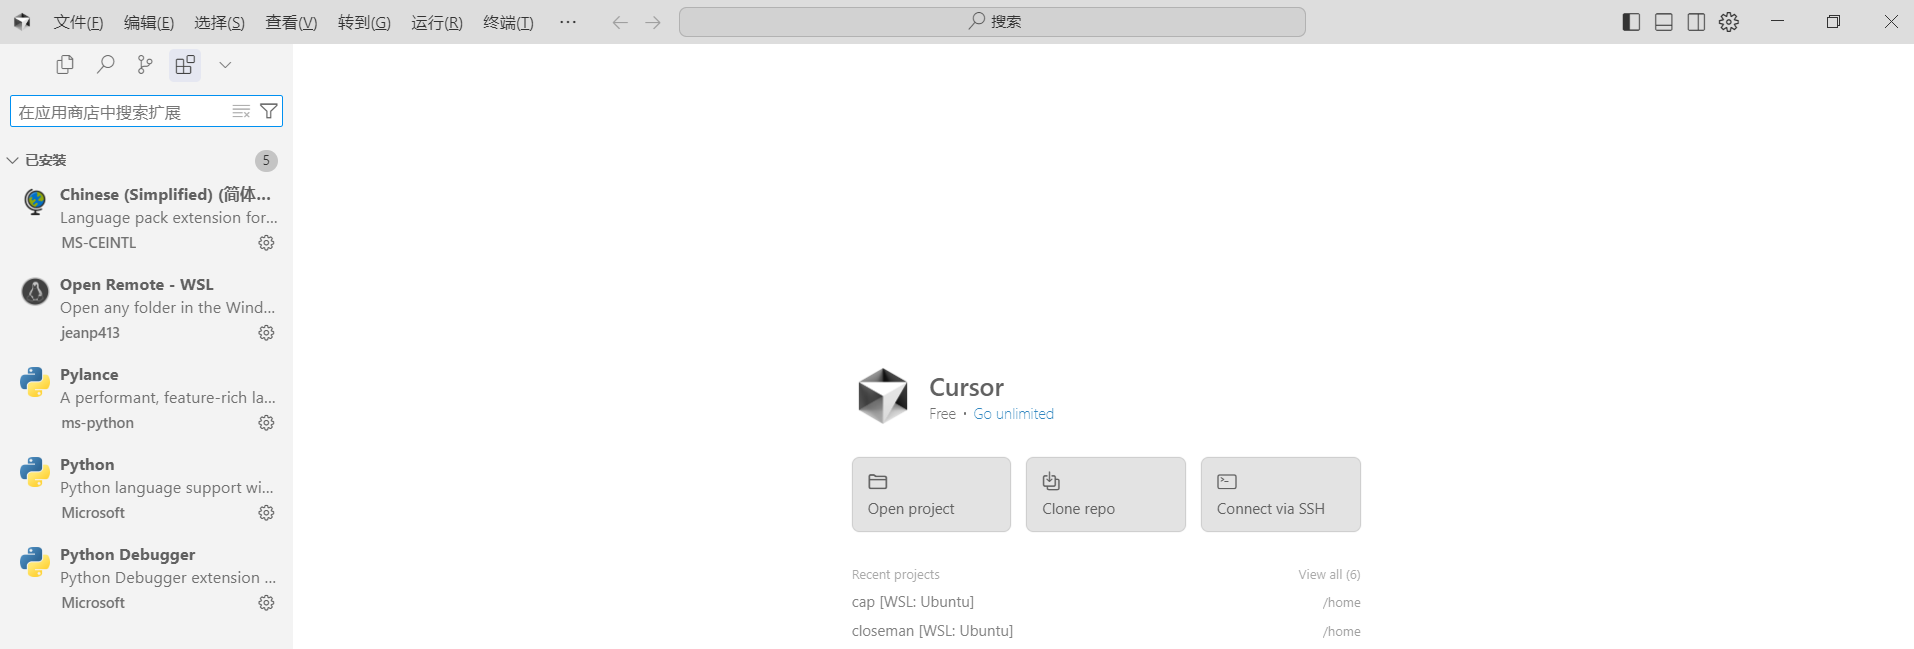
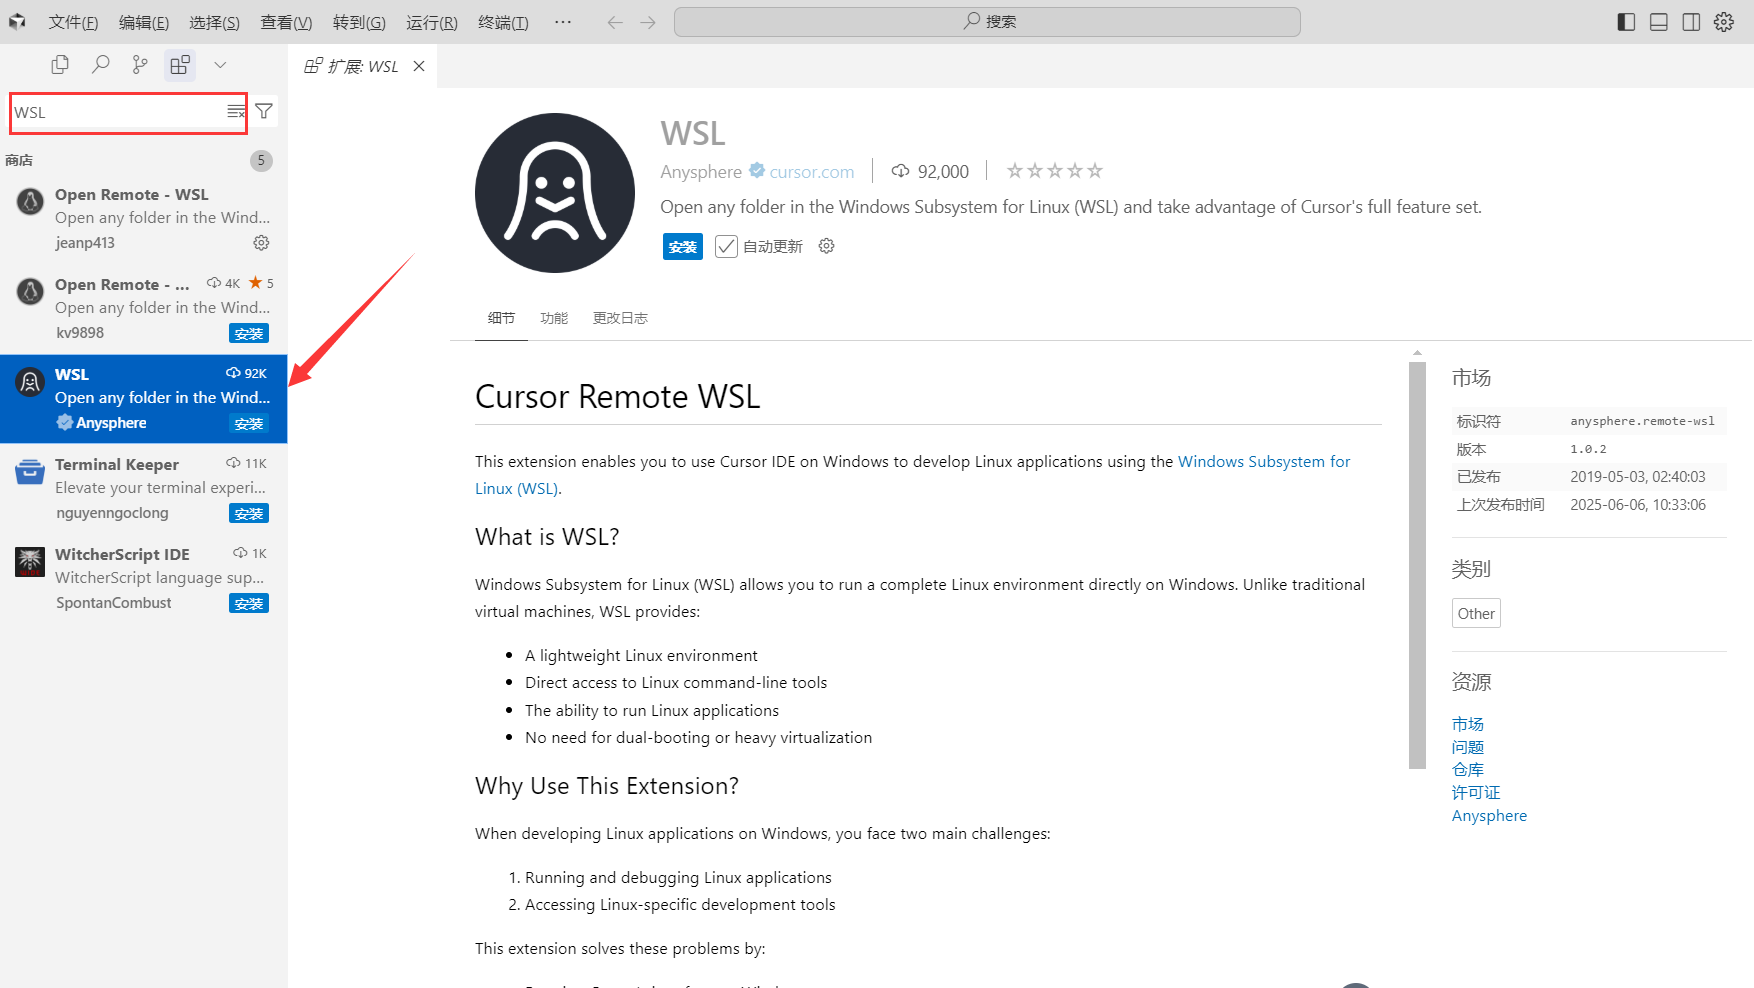
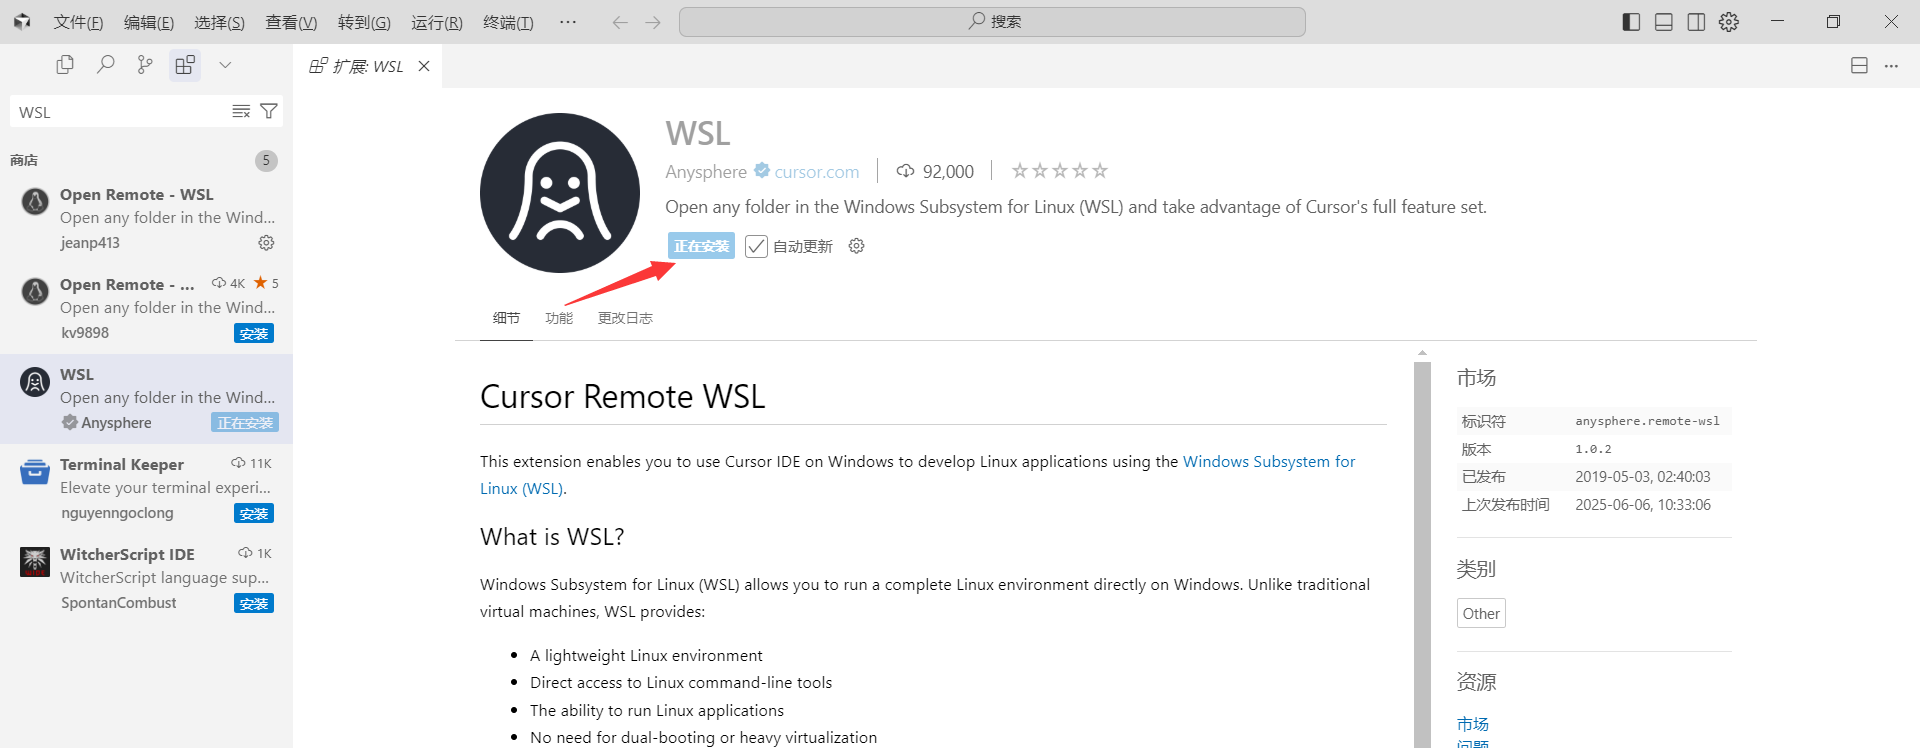
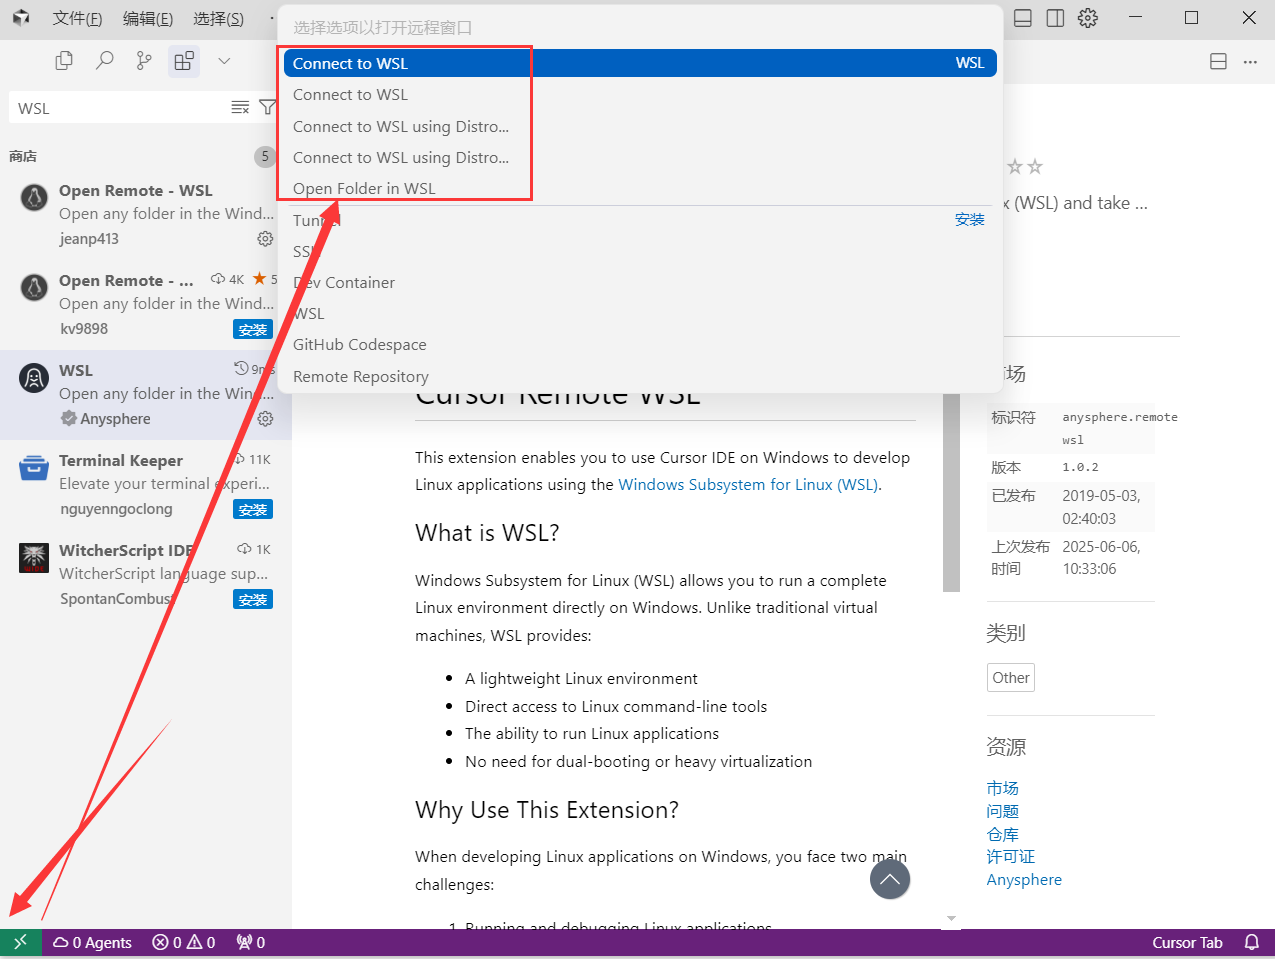
可以直接安装 Claude Code 插件;也可安装 Microsoft WSL 扩展,在 Cursor 左下角远程菜单中选择 Ubuntu。
如果没有“Connect to WSL using Distro”,先安装 WSL 扩展并重启 Cursor。
图片输入
可拖放图片、复制后粘贴,或直接提供本地图片路径,再用自然语言要求分析界面、错误或样式。
深入思考
直接在问题里要求“深入思考”“检查潜在安全漏洞”或“继续分析边缘情况”。复杂推理会消耗更多额度。
项目记忆
/init用 CLAUDE.md 记录项目命令、约定和架构模式,便于后续会话复用。
自动化与 CI
claude -p "使用最新更改更新 README" \
  --allowedTools "Bash(git diff:*)" "Bash(git log:*)" Write
非交互模式适合脚本与 CI,请明确限定允许使用的工具。
Git 工作树并行开发
git worktree add ../project-feature-a -b feature-a
git worktree list
git worktree remove ../project-feature-a
每个工作树拥有独立工作目录,同时共享同一份 Git 历史。
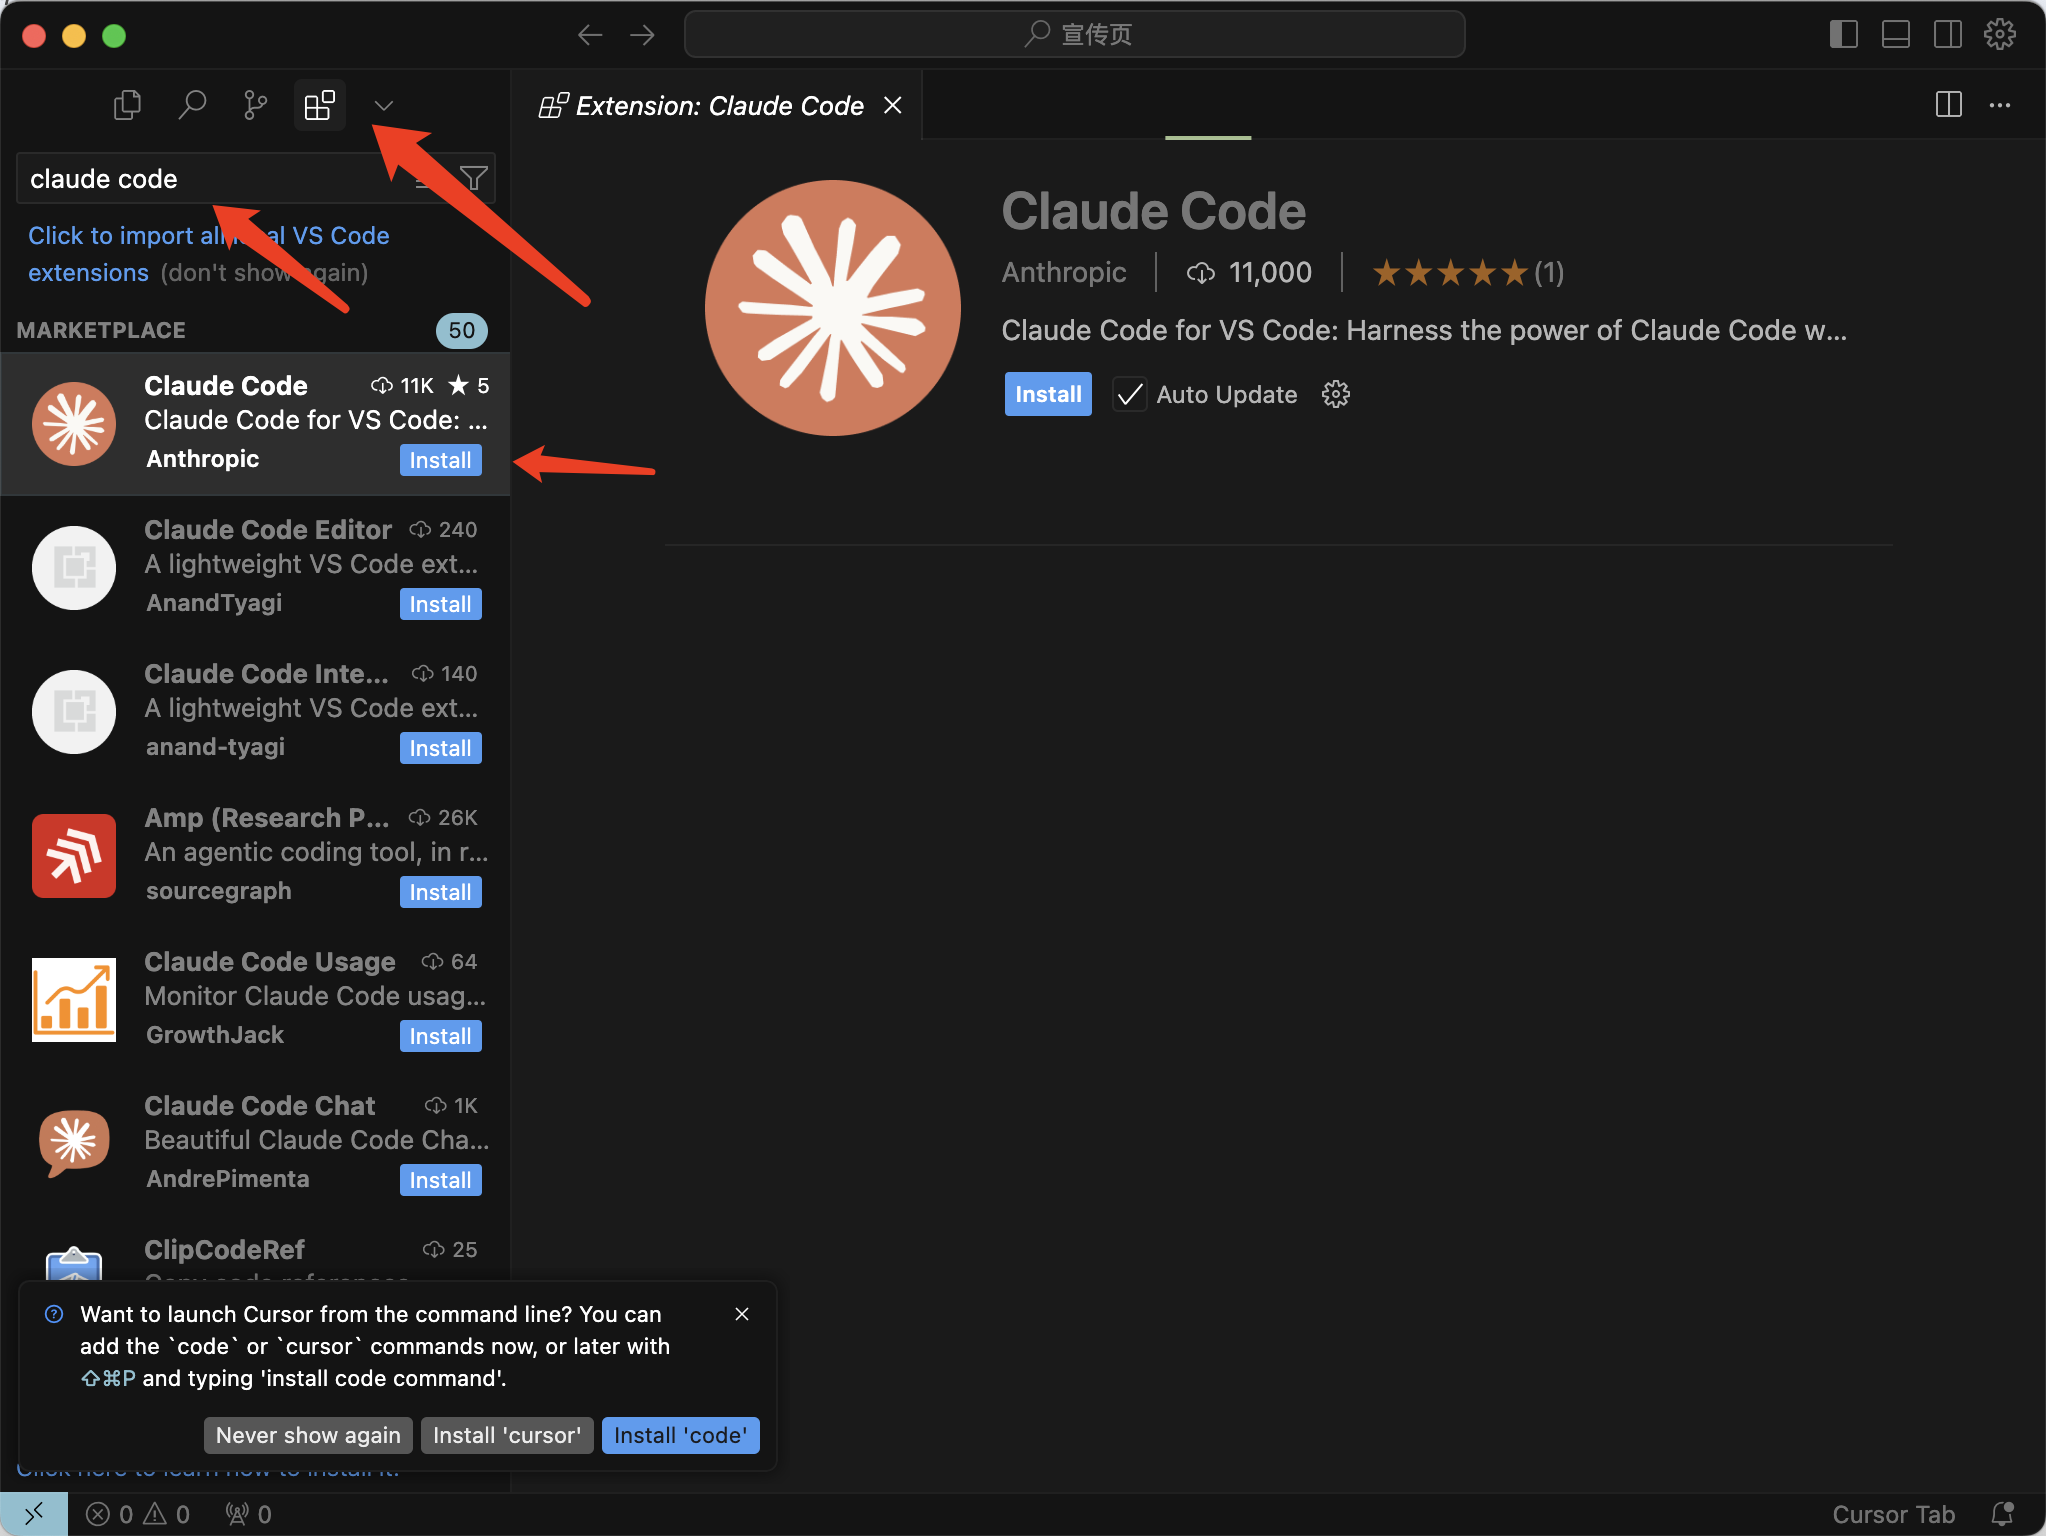
Cursor 安装 Claude Code 插件
打开扩展市场,搜索 Claude Code,认准 Anthropic 发布的插件并安装。
Cursor 连接 WSL 图示步骤
Windows 用户可以让 Cursor 连接 Ubuntu/WSL,再在 Linux 环境中启动 Claude Code。客户端版本变化后按钮位置可能略有不同。

常见 API 错误
- 400:请求格式或内容有误
- 401:API Key 无效或未正确配置
- 403:当前 Key 没有对应权限
- 404:地址、接口或模型不存在
- 413:请求过大,建议先使用 /compact
- 429:达到速率限制
- 500:服务端意外错误
- 529:上游暂时过载,稍后重试
需要 Claude Code 官方说明?
本站已经覆盖接入配置;高级功能可继续查阅 Anthropic 官方文档。
创建密钥,开始使用 RabbitCode
密钥、余额、兑换与使用记录都可以在控制台集中管理。